Search the Community
Showing results for tags 'n scale'.
Found 21 results
-
Can I install DCC on a Poppondetta Tokyo Metro 1000 Series
BulletTrain816 posted a topic in DCC, Electrical & Automation
Poppondetta produces some trains however due to its obscurity there is no info on how to install DCC or if there is any decoder that fits it. Here is the link: https://maker.popondetta.com/maker/?p=555 -
Circuito de Guilhovai - A real Portuguese place in 1:160 scale
Giugiaro posted a topic in Layout Building
Good evening everyone! It took me half a year to start working on this project, but I finally started the "Circuito de Guilhovai", a 1:160 representation of a random rural area in Portugal that could fit in a 1200x600mm plywood board. My father worked on the wood base, and now I'm working on the terrain, made from 2mm cork and traced to match the real life terrain. I'm doing it at my workplace, so progress will depend on how much work I have to do, plus if I get bored from working on my master's dissertation (which is the biggest priority). I know this approach to terrain was going to be a huge pain in the bottom, but cork is readily available in Portugal, easy to work with and I can rest assure that all the unusable pieces can biodegrade naturaly.
-
What DCC decoder is compatible with the Kato Yamanote Line E235 (N)
BulletTrain1805 posted a topic in DCC, Electrical & Automation
I am looking to buy a decoder for my E235 I have looked through multiple forums and not found a thing, does anybody know? -
Here is the skyline of Ciudad de Gloria as it looks today on my N Scale railroad which features commuter rail and subway lines. The top photo was taken from a hill not away from my metropolis. On the bottom is a helicopter view of the city, which is named for my late Mom.
- 8 replies
-
- 9
-

-
- n scale
- commuter rail
- (and 3 more)
-
Hi, here is the layout I'm building. It has 2 independent layers, with two independent control panels (placed on the left and right hand side). The idea is that my two kids can play at the same time. Everything will be operated by an Arduino Mega board. Speed and direction of the trains will be controlled thanks to two LR293D IC connected to the Arduino. I will do the coding according to the control panel I've designed. The two control panels have switches for lights and other things like red light or the cable car, but right now I'll go through to the main part that operate the trains. From left to right (as shown on the picture), there is a FULL TOP switch – the equivalent of a hand-brake a HARD BRAKE button – to quickly decrease the speed a SOFT BRAKE button – to gently decrease the speed a HOLD switch – when turned on, the train maintains the current speed, if not it will slowly decelerate (unless the "increase speed" is being pushed). a INCREASE SPEED button – to accelerate a DIRECTION switch – to go forward or backward I've made a little "back door" underneath the layout. The Arduino board and the other boards are fixed to this door. All the cables are labelled and converge there. I try to make it as clean & clear as I can, for maintenance, future improvements and especially troubleshooting while coding the Arduino. Also, the little door is convenient since the layout is stored vertically (I don't have a lot of room, nor a man's cave 😔). Anyway, I can easily work on the electronics and cabling, while the layout is upright against the wall. That's it for now. I'll post more details through the next steps. I'll happy to reply if you have questions. I do have a question for the community tough. I've used Minitrix flexible track nailed directly on the 5mm plywood. I wonder if I should have put cork underneath the track. What's the purpose of it? reduce noise? easy track replacement? On the other hand, some of my turns are tight, and the nails+plywood hold everything in place very well. Bye for now
-
So I am hoping to install DCC sound into a Kato N scale D51 steam locomotive (product number 2016-8). I have the locomotive, but I have yet to purchase a decoder or speaker. I wanted to know if anyone else has done this or a similar project and if they have any recommendations for which decoder or speaker to use and if they have any tips for doing the conversion. Thanks in advance!
-
Hello everyone, I'm on the hunt for some software not too terribly expensive (hopefully) that lets you plan out an N scale track plan. I only plan to use sectional Kato Unitrack, so an archive of Kato track parts is a must. Do you have recommendations or programs that you would avoid? (By the way, I am using a PC) ~Phil
-
Well, I am nearly finished rebuilding my layout. Say Hola to Ciudad de Gloria, a modern metropolis boasting a subway system with a new railcar fleet and a snazzy and clean commuter railroad. The city is named for my late Mom. The Mayor and the City Council stress safety and passenger comfort over speed and profit. In fact, the railroad's motto is: "We get there when we do." Passenger traffic is booming and a new fledgling container port and soon to be added new auto transload center guarantee precious revenue and tax dollars for the future. I hope to add a couple of more subway set in the future, pending continuation of old people checks. And I'm even gonna try to cover up the city end of the layout with a plateau filled with grass and suburban homes, this way hiding the end tracks. It will also create more space since I'm not quite yet completed putting down all of the buildings I have. I've actually added the tallest structure on my layout, a Con Cor pre-owned hospital. But I still wish I had a proper car garage. LOL
-
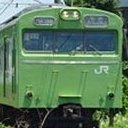
Hi, I just got myself a 103 series kit from Greenmax. I also got 4 sets of bogies and a set of pantographs, as specified by the manufacturer. Everything went well when I assembled the kit. However, I ran into a problem while trying to attach the bogie to the car itself. There appears to be no way to connect the bogie and the car, and I wasn't able to find answers to my problem online. Attached below are the pictures of the bogie and the car. Thank you for reading this, and any advice or help would be appreciated. This is my first time using a forum, so I apologize for any mistake that o may have made. Cheers, kokutetsu103
-
Hello everyone! Today marks one of the first days that I've begun work on an actual (hopefully) N-Scale layout! As these first two pictures demonstrate, I finally arranged a deal to get some space for a small layout, which at the moment is 16' × 2' (really only 20", because of the upper shelf support poles.) Eventually, when time, useable space and family permit, I have plans to expand it into a reversed 'F' shape, through the use of additional shelves along a different wall, and a heavy duty wooden center island table left over from some HO-scale projects. The shelving on the rear wall will the be top part of the letter 'F', and will add about 11' by 2' (again, only 20" of that useable). Final dimensions of the center island table TBD. (Possibly 5' × 6'?) I'll try and post the potential track plan(s) later tonight! I am also always open to feedback, so please chime in, it might really help me out! Thanks for your interest! ~Phillip R.
- 113 replies
-
- 10
-
-
 Hi, my name is Wei and I am the founder of the startup GUNG-HO! Miniatures. We have recently released a set of 2 N scale structures, including our railway warehouse kit for the Taiwan Railway. These kits, especially the railway warehouse were often found in Taiwan and based on Japanese architectural styling during the colonial period. They will look quite at home in a Japanese railway setting, mainly because of its design origins from Japan. Railway Warehouse This style of railway warehouses were a common track-side structure in many Taiwanese stations that handled freight. The design of the structure was carefully referenced after Taiwan Railway's Neiwan Branch. It comes with a distinctive Japanese feature, end walls that extend to cover the roof and awnings to protect against the spread of fire. One or two would look good in a siding serving a pair of short boxcars. Little Red Brick House The brick house fits the theme of and branch lines, often scattered across farmland and rice paddies. I have painstakingly hand carved the brick details and included a little side house that could be attached to any of the walls for extra detail. Station Push Cart Our station push cart is an intricate laser-cut kit that would look great in a station setting with a couple hanging around platforms. The kit can be assembled in a matter of minutes with super-glue. However, painting before assembly is recommended then followed by a touch up with a toothpick. Comes in a pack of 2 per kit. The kits are cast in fine white Hydrostone/ Ultrastone, a material tougher than plaster, easily painted with acrylics, and sculpt-able with a hobby knife. Both kits feature intricate laser-cut windows, however, the warehouse comes with cast resin doors. We offer both an updated version with one piece roofs and original versions that requires more assembly. You can find the details on my Etsy shop at www.etsy.com/shop/gunghominiatures or through our Taiwanese site at www.gunghominiatures.com. Please note we ship from Canada and our Taiwanese site can only ship to Taiwan or Japan. All other orders please visit the Etsy store. Feel free to leave any questions :glasses2: Stay tuned, more releases to come. Cheers,
- 34 replies
-
- 12
-
-
- n scale
- structures
- (and 4 more)
-

Has Anyone Cut Kato Unitram Plates In Half To Make Grade Crossings?
Philphil posted a topic in Track Systems
Hello all, As with any railroad there comes a time that a railroad track has to cross a roadway, which requires a grade crossing or grade separation. Since space is an issue, even in N-Scale, I am forced to opt to use grade crossings instead of separations. I can't say I'm particularly thrilled with any of the N-Scale Japanese-style crossings currently in production, but I really do like those Kato Unitram plates. Has anyone cut the plates, parallel to the track in order to space them further apart for use on standard Kato Unitrack? ~Phil -
Hello all, I checked around to see if someone had already posted this question, and didn't see anything close, but please forgive me if I missed something! Nearly any model train layout, especially one where the prototype is set in Tokyo, needs more transportation options than just trains, I'm talking about BUSSES! They're seen nearly everywhere, and they're certainly something that I'm currently missing... Could anyone tell me which busses would be prototypical for operating in central Tokyo, for example, around the areas the Yamanote line runs? There are so many colorful options, and I just seem to get lost in all the possibilities! I do know of the Toei bus, for which I'm looking for multiple n-scale models of, but there must be more, right? ~Phillip
-
Hi All! (NOTE: various links in the post lead to my blog) A member on the forum recently said that my little re-do adventure might be of interest to some of you. I had a layout that was really humming along. Scenery, structures, and little scenes were in full swing. However, there were major items that were not working for me on the layout - a major one involved trains and operations, which I wasn't as interested in when I originally started. . After months of thought, I decided to tear the whole of it down and start over again. This was NOT an easy process! I had to have a large glass of whiskey before starting to pull stuff off my layout and pack it up! hehehe However, now that I have things the way I like on the train and track front, I'm SO MUCH HAPPIER! It's night and day. I'm moving forward on getting back to the point where I can get scenery and structures back on, but all in all it was well worth the effort to get things to a point where I'm no longer sad and disappointed when I run trains around the space. So, I suggest that you make an effort to be happy with your layout without settling for "well....it's fine, I guess". Make it something you really enjoy! Any other re-do stories out there? More can be found on my blog: https://n-rail.blogspot.com/ Cheers!
-
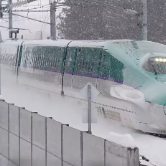
Really loving the Tomix EVA 500 Shinkansen. I had some issues with my layout that I had to address to get it to run properly - track and station items, but I dialed them in and...SO COOL! hehehehe Anyone else have the Tomix AND KATO versions? I was just curious about which looked and ran better.
-
Trains running. I'm thinking about expending my freight track. Yikes. :) http://n-rail.blogspot.com/2016/09/nrail-music-video-trains-runnin.html http://n-rail.blogspot.com/2016/09/nrail-music-video-trains-runnin.html
-
I am interested in specific steam era Japanese n scale number plates. In particular, I would like to get a numberplate for D51 4, which I will be converting a D51 slug version to. There are others but this would be a really good start.
-
I started this layout quite a while but not continuously, so the project goes slow. I will exhibit it next month and still have some details to tackle with... I'm not going to bother you with research photos, you're all familiar with rural lines in Japan. I initially designed the layout with tighter curve radius to keep the size small (800 X 400mm). But when I started building it I felt tempted to enlarge a little bit. Now it measures 1050mm long. Forgot to check the dimensions of my apartment building elevator, now I'll have to go down 3 flights of stairs for just 50mm... The construction is done with insulating foam boards 30mm thick. I covered this base with laminated Das Pronto clay.
-
Hi, what is difference in between tomix bus system set A-1 and A-2?
-
Long a staple of hobby-shop shelves, hobby manufacturer Model Power looks to be closing up shop for good :( Dear Model Power Customers, After nearly 50 years serving the hobby industry, our 3rd generation family business will closing effective immediately. In 2007, our banks began an aggressive deleveraging process. They no longer approved of a profitable and paying client such as ours, which had been reliant on inventory. This is why one of the industry's most extensive lines, had begun to see much of its products unavailable on the market. Now it will no longer be seen at all. During these past 7 years, we had made changes to the business in order to accommodate and adjust to the changing nature of the business relationship with our lenders. We had offered multiple solutions to our lenders in order to "fix" our situation, all were rejected, came with different restrictions, or offered to little too late. In all our efforts, no arrangements by our lenders would allow for Model Power to arrive at a position in which we could get back to fill our customer needs. We would like to take the time to thank all of those whom we have worked with the past 50 years. To our customers and competitors within the industry, we thank you. Sincerely, The Model Power Family
-
Here is my layout in N scale


.jpg.1e28c51c892712ed3b8dd4b3f3c90cae.jpg)
.jpg.b37d85ea5194d98cc4bb33810d33470b.jpg)