Samurai_Chris Posted April 15, 2011 Share Posted April 15, 2011 Sorry mate, I just noticed that you have already done that.. :P Link to comment
keitaro Posted April 15, 2011 Author Share Posted April 15, 2011 Thanks Chris, I agree with you it needs more of a natural slope if you look at the last pic I posted it looks stupid huh? I am going to fix that with some plaster and a bunch of shrubs so it looks more natural. Same for the other side however I am going to leave the portals as is on that photo but make it look like it's been hollowed out by again using shrubs (clump) to give a less flat look around the portal. I have added some more trees and detail around the mountain and the 2 farms still need to get $$$ for water supplies and make the rice field. i'll try to post pics tonihgt but no promises Link to comment
Samurai_Chris Posted April 15, 2011 Share Posted April 15, 2011 Hey, cool mate, I am sure you have it all worked out upstairs.. Look forward to seeing the new pics.. Link to comment
keitaro Posted April 15, 2011 Author Share Posted April 15, 2011 very little progress 2 Link to comment
Tecchan Posted April 15, 2011 Share Posted April 15, 2011 It needs to be "roughened" a bit to make it less clean but it's looking really nice! Be sure to explain your friends what a swastika means in Japan before they accuse you of having nazi bee hives on your layout lol! Asside form the joke, I really like this kind of details on a layout, it's a paper kit right?! Link to comment
keitaro Posted April 15, 2011 Author Share Posted April 15, 2011 yeah sankei paper kit they're fun to do although i made the mistake of placing one piece wrong with glue and realising i stuffed up by then it's too late as u will tear the paper if you try pull apart see below. shame it had to be that side as well as thats the side you will always be looking from. Ohhh well. Link to comment
Mudkip Orange Posted April 15, 2011 Share Posted April 15, 2011 Some of those Sankei kits are pretty sweet. Link to comment
Samurai_Chris Posted April 15, 2011 Share Posted April 15, 2011 Why is the Ginja symbol even on the side. They are really only used on maps? Link to comment
keitaro Posted April 16, 2011 Author Share Posted April 16, 2011 hey so i apainted fences up completely and i did some poor painting on the tunnel portals. Also assembled the tomix construction house diorama piece. I like it 1 Link to comment
KenS Posted April 16, 2011 Share Posted April 16, 2011 Why is the Ginja symbol even on the side. They are really only used on maps? Are you referring to the swastika? I've never heard it called that. Those are often found on Buddhist temples as they are a symbol of the Buddha and of good fortune. I remember during the Nagano Olympics the commentators spent a lot of time explaining why the buildings they were showing for "local color" had that symbol on them. Unfortunately, for those of us in the west, there are other associations that are much stronger than the older ones. Link to comment
Samurai_Chris Posted April 16, 2011 Share Posted April 16, 2011 Ginja is Japanese for temple.. Although my spelling might be wrong... Link to comment
Tecchan Posted April 16, 2011 Share Posted April 16, 2011 Ginja is Japanese for temple.. Although my spelling might be wrong... I would spell it Jinja (じんじゃ) instead of Ginja (ぎんじゃ). Also, I think Jinja is more for a shinto shrine and Otera (おてら) is a Buddhist temple. :-) Link to comment
keitaro Posted April 17, 2011 Author Share Posted April 17, 2011 placed the tunnels and the toilet rolls to give a tunnell look in side. painted a grey cement colour. I used dark green lichen, can't say I like it very much might remove and find something a little more suitable. tested with e5 and 800 tsubame and they ran fine no rubbing inside so works well. 1 Link to comment
Kamiyacho Posted April 17, 2011 Share Posted April 17, 2011 I used dark green lichen, can't say I like it very much I also find lichen pretty unsatisfying. I use a lot of Scenic Express-Silflor products and also Woodland Scenics Fine Leaf Foliage. Recently I've also been trying JTT trees. Link to comment
keitaro Posted April 17, 2011 Author Share Posted April 17, 2011 lol it looks more like n scale sea weed. i'm definately going to have to visit my local store for some supplies as i am completely out except for lichen :( Link to comment
keitaro Posted April 19, 2011 Author Share Posted April 19, 2011 So I went to the hobby store and had no clump Anyway he had a woodland scenics water kit with paint water and scraper and sponge. Was $16 so I got it and started the lake. I now need to buy another bottle of realistic water. Pretty good although I can see a few bubbles but I'm not fussed. Will be ordering off eBay for another bottle today Link to comment
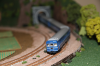
keitaro Posted April 30, 2011 Author Share Posted April 30, 2011 ok so I finally got around to playing with the new tomix de 10-1000 It comes with numerous plates to put on it. in addition to this it has to be the best running train I have so far. I ran this on roughly 15 on the dial (out of 100) and it crawled so smooth it was incredible. This all wheel pick up really does make a difference. I ran all my trains at bare minimum speed and most would get stuck at the double switch or a corner where the ballast wasn't so great but this train just keeps going. In addition to this it has an incredible amount of power and speed for such a little guy. Video compares my micro ace dd51 1805 with the tomix both at 50 on the dial. You can tell the spped difference. Although the dd51 is a more realistic speed pic 1 : dd51 and de 10 next to each other pic 2 : de 10 of course pic 3 : next to each other from above pic 4 : underneath pic 5 : pulling some freight on too small a line (for now anyway) and of course the video displaying the speed difference as far as dcc goes i opened it up and forgot to take a picture. It was really hard to pull apart and very cramped. but i think it would be possible to get a decoder in there 1 Link to comment
brill27mcb Posted April 30, 2011 Share Posted April 30, 2011 Thanks for sharing your experience with this new version of the DE10. Rich K. Link to comment
keitaro Posted May 18, 2011 Author Share Posted May 18, 2011 update**** So I am making progress on this currently flocking the mountain which takes a long time. I'm planning to have the mountains finished very soon. WIll post pics once complete. Also I have marked the road ready for construction. Hoping my lights come tommorow or friday so I can pre drill holes ready for construction. Once I have the roads done all that will be left is the baseball field, more trees and weathering buildings and installing the building led's. Of course the people need to be added too. Bit excited because if time permitting I may have this 99% complete by end of month. Of course a layout is never complete ahahahha. Link to comment
keitaro Posted June 1, 2011 Author Share Posted June 1, 2011 so i have been slacking off / busy but just now i finished the mountains. I have also received my street lights and leds for buildings so i shall be wiring them after i complete the road my next step. Just now mapped out the road and looks as though i won't have time to do this till next week end or maybe even the one after that.... however for now i am happy playing with my new trains. Link to comment
keitaro Posted June 8, 2011 Author Share Posted June 8, 2011 https://www.1999.co.jp/eng/10113683 all right so as a side project i bought one of these from bargain bin in hs. while i'm note sure of the release date for this model i guess it's ancient as it uses old growly and boy does it growl. Okay so i have almost completed the firs car tonmight and did some of the shell. While it's fun to construct the model from 100 pieces don't expect this model (not sure about other newer ones) to run like a tomix or kato.... I ran the motor car with basic uncompleted shell and it is noisy to buggery and not very smooth. having said that for $60 thats what you get. I also notice that you cann attach the tomix tn couplers to it and cut off the rapido. One major nark i have is the shell doesn't clip in place on the body they give you 4 small strips fo double sided tape (motor car only) the other i wouldn't bother with as it's light and doesn't seem to slip off easily. however if you have your own double sided tape or want to supa glue it or pva it's fine to do so. and other issue is the floor doesn't reach all the way to front/back of the car so there is a gap. This model contains no front / rear lights as expected but i thought i'd cover that anyway. When i complete i will upload a bunch of photos and the promised photos of the mountain on the layout. Link to comment
disturbman Posted June 8, 2011 Share Posted June 8, 2011 Yes, those Greenmax motors are quite noisy. It's really a pain... I'm also not very fond of the distance between the carriages, way too big for my taste. I never thought to look to see if those Greenmax kit could accept Tomix TN couplers... I should do that and upgrade mine. Anyway, even with those limitations these projects are fun. Link to comment
keitaro Posted June 8, 2011 Author Share Posted June 8, 2011 I'm not sure all models do the tn but my instructions show the tomix one and it has the 2 dots on each end edge to clip it to. However there is a half 3 - 5 mm gap on each side between the shell and the floor. Which worries me that they may be too close to each other. Either way tonight I will finish it if I have time and post some pics / video Link to comment
Kabutoni Posted June 9, 2011 Share Posted June 9, 2011 From my experience, older GM models need some heavy modification for body-mounted TN couplers. If you're willing to slice into 'em, it's not a big deal... Link to comment
Recommended Posts
Create an account or sign in to comment
You need to be a member in order to leave a comment
Create an account
Sign up for a new account in our community. It's easy!
Register a new accountSign in
Already have an account? Sign in here.
Sign In Now