mags_minibuilds Posted November 12, 2023 Share Posted November 12, 2023 I had started my H0e adventure in June where I had acquired a few World Kougei brass kits. After assembling a couple kits, I'm now working towards building a small fictional forest layout and these are the parts I'd like to include: a forest, bridge, staff station, turntable, shed... I acquired some Peco 009 Electrofrog turnouts and Noch scenic items from the UK. The Peco flex tracks and balsa/basswood are from the US. I also purchased an IKEA Fabrikor glass cabinet so I can have a place to store the layout when it's completed. Apparently, this resulting in me spending a week organizing my hobby room to accommodate this new cabinet. But I'm very happy that now I have a nice display for my dioramas, I feel like I have my own model railway store. I used RailModeller Express to create the track plan and Peco was very helpful and provided me exact placements of the insulated rail joiners and feed wires for their Electrofrog turnouts. My next step will be laying out the tracks and figure out exactly how big I need to make my baseboard. I'm anticipating to use 1/8" baltic birch plywood (quality of ones used for laser cutting) and premium pine for the framing. 7 1 Link to comment
Martijn Meerts Posted November 12, 2023 Share Posted November 12, 2023 Looking forward to seeing the progress on this 🙂 1 Link to comment
mags_minibuilds Posted November 17, 2023 Author Share Posted November 17, 2023 A couple months ago, I had requested some drawings from Mr. Morikawa from Modellwagen as I really admire his scratch-built structures (and H0e brass kits) and I have difficulty with figuring out the scale of these Japanese buildings. He had graciously shared some of his drawings and I started building the staff station. For the wooden siding, I initially used 1/32" Balsa wood but it was the wrong thickness and it turned out to look rather chunky. At the end, I'm not sure if I liked the stained Balsa wood look either. After some contemplating, I gave myself a redo and started over with styrene since I have a variety of strips and sheets on hand. I'm planning to airbrush and weather it to look like wood. I'm working on finishing the windows now, which is a painstaking task but I suppose I'm up for the challenge. Just FYI, Evergreen makes plastic clapboard sheets and Echo Model makes windows/doors. 6 Link to comment
mags_minibuilds Posted November 28, 2023 Author Share Posted November 28, 2023 This station building is coming along nicely. To make the plastic look like wood, I used a combination of 120 grit sandpaper, razor blade and a handsaw bit to create some wood texture. The upside of gluing my own styrene strips for the wooden siding is that the imperfection in the spacing gives it a more organic look. 😆 The corrugated roofing material is from KC's Workshop, the product description says it's made from Metallic card stock material and takes paint well. The outer material is rubbery and smooth so it's somewhat flexible. Next step is to paint once the primer dries. 8 Link to comment
mags_minibuilds Posted December 5, 2023 Author Share Posted December 5, 2023 And the staff station building is complete! The corrugated paper took Vallejo paint and weathering powder very well. I made the frosted/dirty windows by spraying Flat clearcoat on clear styrene, it's difficult to see in the photos but some parts of the dirty window was "cleared" up by rubbing Novus scratch remover. Now I just need a layout to put this on. 19 Link to comment
tossedman Posted December 6, 2023 Share Posted December 6, 2023 Looks fantastic! Well done! Can't tell it's styrene. What thickness of styrene did you use for the window frames? They look awfully thin. Cheers, Todd Link to comment
mags_minibuilds Posted December 6, 2023 Author Share Posted December 6, 2023 Thanks @tossedman! I used 0.020" strips to make the window frames. It took a bit of effort to custom size each frame so it fits the opening. 1 Link to comment
cteno4 Posted December 6, 2023 Share Posted December 6, 2023 @mags_minibuilds excellent works kudos! jeff 1 Link to comment
tossedman Posted December 7, 2023 Share Posted December 7, 2023 (edited) Another couple of questions Mags. What are the dimensions (in mm) of the door Morikawa-san designed? And am I correct in assuming this is 1/87 scale and not 1/80? Thanks, Todd Edited December 7, 2023 by tossedman Link to comment
mags_minibuilds Posted December 7, 2023 Author Share Posted December 7, 2023 @tossedman The doorway opening is 22.5mm H x 21mm W. For this building, Morikawa-san used laser cut paper windows/doors from Echo Model #241-247. If you click on the product link it'll have a picture and you can see (barely) the dimensions printed on it. I thought that'll be helpful for future structure builds. Link to comment
tossedman Posted December 8, 2023 Share Posted December 8, 2023 Cool! Thanks! I've been eyeballing some buildings and thinking of drawing up some plans to laser cut. Knowing door and window sizes makes it easier to judge the size of the rest of the building. I can cut similar windows as to what Echo Models makes as I have Polybak or Laserboard, as some people who sell it at highly inflated prices call it, and a laser cutter. In fact, I made some that were pretty much the same for the train shed that I built. The only difference was that I was guessing at dimensions. Todd 1 Link to comment
mags_minibuilds Posted December 8, 2023 Author Share Posted December 8, 2023 This week I have been working on laying out the tracks with my DIY rail bender. I am a complete novice on wiring/electrical so I emailed Peco a diagram of my layout, as I had no idea on where to put the insulated rail joiners on the Electrofrog turnouts and they had sent me back a diagram on exactly where to put them. It wasn't until this morning that I realized to enable locos to be isolated in either loop line, the power feed to each of these loops would need to be via separate on/off switches so that I can power only the route required. I initially thought that the power will be routed by the direction the turnout is thrown without adding extra switches, but I guess that's not how the Electrofrogs work. So now I'll have to install a couple switches, not a big deal I suppose. The turnouts will still be manually thrown. My plan is to work on the baseboard next week. 8 Link to comment
Martijn Meerts Posted December 11, 2023 Share Posted December 11, 2023 That station staff building looks excellent! Also, even though I've been looking at a lot of narrow gauge stuff, and seen a lot of very sharp and still prototypical curves, the curves on that track plan look crazy 😄 1 Link to comment
MeTheSwede Posted December 11, 2023 Share Posted December 11, 2023 Meanwhile I was thinking about how it's possible to have larger curve radii inside an IKEA Fabrikör than in an IKEA Billy. 😆 Link to comment
mags_minibuilds Posted December 11, 2023 Author Share Posted December 11, 2023 I had spoken too soon…I tested my locos but forgot to test the passenger and flat cars. When running on that tight curve, the wheels move but with resistance. I fixed it (or at least most of it) by widening the curve. I will be mostly running my 0-4-0 Porter, a diesel and a few speeders but in the future, I have to be very mindful of the locos/cars I purchase. The Ikea Fabrikor is 15" deep and the Billy is only 10.5", I have both cabinets. 5 Link to comment
mags_minibuilds Posted December 12, 2023 Author Share Posted December 12, 2023 I have 6 sections of track and 3 turnouts. On a small layout like this, is there a need to put feeder wires on each section of the track, on all the rail joiners or solder the rails together? Link to comment
cteno4 Posted December 12, 2023 Share Posted December 12, 2023 Nope usually it’s every 5-10 sections unless you have very poor track joiners. I’ve had small Ttrak loops of like 8 modules (16 sections if Unitrak) with a single feeder and no real noticeable voltage drop in running of trains. At shows we usually try to do a drop ever 5 to 8 modules to the main buss. jeff 1 Link to comment
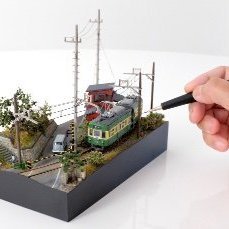
mags_minibuilds Posted January 10 Author Share Posted January 10 Finished the baseboard before Christmas and left it out to dry over the holidays. This is roughly how I envision the terrain to look like. It's my first time using cork underneath the rails so I'm curious to see if the locos run smoother and quieter. The next step is probably soldering up all the feeders and adding the switches before I proceed with building up the terrain with plaster and stuff. I may be able to fit in one or two more buildings but I'll see how things progress. 9 Link to comment
mags_minibuilds Posted January 18 Author Share Posted January 18 (edited) Here is my DIY control panel equipped with a PWM controller and 2 toggle switches to operate the loop lines. I used a piece of 1/8" acrylic, masked it, spray painted it black and then added a piece of white styrene. The controller is recessed into the layout to save some room in the cabinet. There will be a plugin jack for the wall power adapter. I'm delighted that I was able to use the onboard red LED light indicator to show through to the front panel. I'm not sure if I'm using the light in the correct way but it works. Edited January 18 by mags_minibuilds 5 Link to comment
mags_minibuilds Posted January 19 Author Share Posted January 19 All the electrical is done and tested before moving onto the next phase. Now I'm at a split between working on the layout scenery or taking a brief break to assemble a World Kougei speeder. 5 Link to comment
Beaver Posted January 19 Share Posted January 19 Assemble the speeder so you can test the track and electronics more thoroughly. Testing with one loco only may not reveal some issues as different types of motive power respond differently to the track and circuitry. Ideally test with all the different stock you want to use before painting and ballasting track. More practically speaking one of each kind should be enough. 1 1 Link to comment
mags_minibuilds Posted January 20 Author Share Posted January 20 @Beaver That's an excellent point. As a matter of fact, the two Speeders I have use the coreless motor so I'm curious if it will work with the PWM controller I've installed. Link to comment
Martijn Meerts Posted January 21 Share Posted January 21 They're running really quite smooth, looking good! 😄 1 Link to comment
tossedman Posted January 21 Share Posted January 21 Looks excellent Mags. What sort of bridges do you have planned for this layout? Cheers, Todd Link to comment
mags_minibuilds Posted January 22 Author Share Posted January 22 @tossedman Great question, for the upper right corner a wooden trestle bridge. The other opening will be for a small metal bridge that either I modify this Greenmax 2523 bridge that is in my stockpile or make one out of styrene. @Martijn Meerts thanks Martijn! I still can’t get myself to painting the little Porter yet, I like the brass look. Link to comment
Recommended Posts
Create an account or sign in to comment
You need to be a member in order to leave a comment
Create an account
Sign up for a new account in our community. It's easy!
Register a new accountSign in
Already have an account? Sign in here.
Sign In Now