Martijn Meerts Posted February 16 Share Posted February 16 Paint is looking really good! Also, I know Miniatur Wunderland has used epoxy to make the "glass" for the lights their cars. It's probably not the easiest to work with though, and you need to be really careful when mixing it in order to not get any micro bubbles. 1 Link to comment
cteno4 Posted February 16 Share Posted February 16 On 2/15/2024 at 1:00 AM, tossedman said: Full cure time for Modge Podge is 4 weeks. 😧 Yeah it’s basically clear acrylic base and that is meant to cure slowly for art purposes. the gallery glass hardens within 24 hrs and is pretty much epoxy like in consistency. I’m guessing it could come off while wet with water as I’m pretty sure it’s an acrylic formulation. It’s not messy to work with. jeff 1 1 Link to comment
mags_minibuilds Posted February 17 Author Share Posted February 17 I had a little panic after I tested my Vallejo whites and realized white colors are very translucent and won’t cover the dark color underneath. The correct way would be to paint the light color first then paint the dark color. I was so determined to figure out which way is easier to mask rather than which color goes on first. Airbrushing the Vallejo Surface Primer and then applying the Vallejo Gloss White had saved me from stripping down all the colors and starting over. The primer really helped with hiding the dark color underneath. I don’t know what ill effects it will have to put primer on top of paint but it’s looking good. I’ll wait a week or so before a clear topcoat. 3 Link to comment
mags_minibuilds Posted February 18 Author Share Posted February 18 I am ecstatic to have found the perfect headlight lenses! I had a remnant piece of clear plastic sprue from a plastic car model kit. I was going to see if I can fabricate something with the sprue but as I looked closer, I saw some of them have flat round nibs so I immediately used a caliper to check the size and it's exactly the same size of the hole for the headlights in the loco. So all I have to do is drill out a small hole in the sprue and insert the SMD LED into it. I will probably glue the LED into the sprue with CA glue and use epoxy to glue the assembly to the loco. I did a little test with a 330 ohm resistor. I ordered the Yellow color on Temu but received it in Red. I didn't want to encounter the same issue so I reordered it from another vendor (AliExpress) and the expected delivery date is a month away 😒 hopefully that's just an estimate and it'll arrive sooner and be in the correct color I ordered. 3 Link to comment
tossedman Posted February 18 Share Posted February 18 Serendipity at its best. Well done! 1 Link to comment
cteno4 Posted February 18 Share Posted February 18 Excellent solution! Another validation (and excuse to the spouse) of why I have saved a box of model sprews! I’ve used the clear bits as light pipes in the past. you can put the mech running on a loop and then try different resistor values to see how bright you want the light jeff 1 Link to comment
Martijn Meerts Posted February 20 Share Posted February 20 Guess I should hang on to all those sprues I have left from the various Gundam kits, just in case 😄 As for the paint, not all light colours are translucent, some work pretty well. The absolute worst is yellow, that doesn't cover anything at all it feels like. You shouldn't have any issue with primer over paint really, especially since Valejo primers aren't much different from their paints. I've even been advised to just use their paint as a primer coat on metal, but the metal should be treated with a metal primer / metal prep. 1 Link to comment
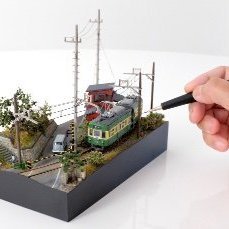
mags_minibuilds Posted February 21 Author Share Posted February 21 (edited) While waiting for the paint to dry and the LEDs to arrive for the Speeder, I decided to work a little on the diorama itself. I carved out some mountains/hills to add elevation and interest. I still have plans for a mini turntable (non-functioning, just for display purpose) and an open-ended engine shed on the right side where it looks rather empty now. I have yet to figure out a compelling scene for the front left corner...I need to research more Japanese forest railway photos. Most things I kind of decide as I go. Edited February 21 by mags_minibuilds Better photos 6 Link to comment
Martijn Meerts Posted February 21 Share Posted February 21 Can't go wrong with some Kiso Forest Railway photos for reference. Anbo Forest Railway is also very interesting. 1 1 Link to comment
Kamome Posted February 22 Share Posted February 22 11 hours ago, mags_minibuilds said: I decided to work a little on the diorama itself This is looking great, Mags. I'm very tempted to build something similar as you can do so much with a small amount of space and there's loads of scope for scenery. The Kiso Railway is a popular location to model amongst Japanese narrow gaugers as the lumber trains create some nice scenic ideas. Other inspiration ideas if you wanted to mix industrial and passenger traffic: Old Seibu Yamaguchi line Murii Forest Railway Ogoya Railway Shimotsui Electric Railway 1 Link to comment
mags_minibuilds Posted February 22 Author Share Posted February 22 Thanks @Kamome for the suggestions, I'll do some research on those railways you've mentioned. This little diorama will be mostly fictitious as I'll be pulling aspects of different forest railways and basically what I would enjoy modeling. There will be many tall trees and mostly scenery. I may add a lumber shack next to the station/rest area building. Link to comment
mags_minibuilds Posted February 28 Author Share Posted February 28 This little Speeder is complete. I attempted to add the LEDs but it was just too much uncertainty as to whether the lens will hold and the resistors were too big to fit underneath the bench seats. I just didn't want to damage anything in the process so I decided to just assemble it to the original. Maybe next time... 7 Link to comment
Martijn Meerts Posted February 28 Share Posted February 28 It's looking and running really good. As for the lights, you can always come back to it at a later date if you really want to. 1 Link to comment
cteno4 Posted February 29 Share Posted February 29 Very nice mags! Runs smoothly and looks nice. as Martijn says always can do the lights later. Maybe get some 806 or 1240 SMD resistors to shrink the space needed. Also get the smallest gauge wire you can like 30g. Magnet wire works, but it’s a pain to strip insulating you need to paint your connections to make sure things are well insulated as you can’t always see where it’s bare. I can pop some 30g wire and also some magnet wire in an envelope to you, got a bunch around the shop. Kudos, jeff 1 Link to comment
tossedman Posted February 29 Share Posted February 29 That's great. Runs really well and looks the part. Well done! 1 Link to comment
mags_minibuilds Posted March 1 Author Share Posted March 1 Thanks Jeff, I’m putting the speeder aside for now and working on the diorama. I’ll let you know in the future if I’d like to have some of those wires, thanks for the offer! Link to comment
mags_minibuilds Posted March 6 Author Share Posted March 6 Started construction of the trestle bridge. It took a couple iterations to find the right combination of scale lumber sizes for it to look right. I started out with 3 trestles but it looked too sparse so I added a few more. Been thinking about how I would paint the trestle bridge. I didn’t want to use stain as I wanted the results to be more uniformly colored. I tried using washes but it dissolved the wood glue and the trestle fell apart. I ended up painting the trestles with Burnt Umber as the base color, then dry-brushed with Stone Grey and finished with a black wash (sparingly). This process took way longer than anticipated but I’m pleased with the results. Still have to add some green moss and horizontal side beams. 9 Link to comment
mags_minibuilds Posted March 7 Author Share Posted March 7 My ultimate forte is giving myself a bunch of additional work. My plan was to make 3-4 trestles and call it a day but it transformed into 9 trestles with horizontal side beams. The bridge has been surviving in the forest railway line for a long time so it’s weathered and janky. It was so much hand painting/weathering that I felt a bit dizzy at the end of the day. I figured the more details the more realistic it’ll look, right? Scenery will be built around both ends of the bridge so the last trestles don’t look like they are floating. For moss, my go-to color is Vallejo Model Color Medium Olive and I use it as a wash and straight up. 10 Link to comment
Martijn Meerts Posted March 8 Share Posted March 8 Well worth the extra effort, it looks great! 1 Link to comment
mags_minibuilds Posted March 14 Author Share Posted March 14 Airbrushed the tracks with Vallejo Burnt Umber and carefully masked the points and hand painted very carefully around the mechanics. I used a piece of wood to scrape off the paint on top of the rails then tested a loco on the tracks. I plan to weather the ties by dry-brushing and adding rust color. Then ballast… I made a bunch of rock forms with the Woodland Scenics molds. I glued the rocks where I wanted them to protrude out. The rocks look haphazardly placed but it really tied together once the rest of the area was covered with sculptamold. I'm planning to cover most of the terrain with tall trees and low covering material. Some plaster finessing work will need to be done between the crevices of the rock mold and sculptamold. 9 Link to comment
mags_minibuilds Posted April 17 Author Share Posted April 17 A little update...weathered the tracks with Vallejo Burnt Umber and some dry brushing with Silver Grey and Flat Earth. Then ballasted with Woodland Scenics Fine Buff. Still need to add some darkness/rust on some ballasted areas. I tested out the locos again to make sure it runs well with all the paint, there was a lot more cleaning up on the rails than I anticipated. Taking full advantage of the weak Japanese yen, I bought some more World Kougei kits (Kiso Baldwin, diesel and passenger car), decals, World Kougei couplers, Echo Model roof tile sheets and misc parts. I caved in and got myself an Imon scratch brush, I just couldn't resist getting one since I'm already placing an order! 6 Link to comment
mags_minibuilds Posted Tuesday at 12:50 AM Author Share Posted Tuesday at 12:50 AM Scratch built the second bridge for this layout. Styrene (my favorite material) was used for the bridge and the supports were made from XPS foam. I'm learning a lot more techniques with weathering and when to use powder vs. washes. I compared the bridge I made last year with the same base color and I much prefer how the weathering turned out this time, with weathering powders of black and rust. It also helped that I used an airbrush vs. hand brushing. With the supports, I painted a solid color then applied two colors of washes. Lastly, I dry brushed with Silver Grey to act as highlights. I still have two pieces to scratch build, a shed and turntable (inoperable, just for decor). 5 Link to comment
Recommended Posts
Create an account or sign in to comment
You need to be a member in order to leave a comment
Create an account
Sign up for a new account in our community. It's easy!
Register a new accountSign in
Already have an account? Sign in here.
Sign In Now