katem Posted August 1, 2022 Share Posted August 1, 2022 (edited) Recently I've been looking back at one of my ongoing projects, named Kitasanriku Project. It is a set of two station modules whose main objective is to be a testing ground for electric work and computer automation created from scratch, being more a programming project than a modelling one. But so far it's coming up pretty nice and I think it would be a shame to not include the modelling aspect. Because of that, I started to think about the track plan for the station once again and tried to come up with something better, more usable, more realistic, but still within bounds made by previous progress and owned items. Situation: Kitasanriku station is loosely based on Kuji station, Iwate, being a terminus station for both JR from one side and Sanriku Railway from the other. Even during JNR era, the station was a terminus for two different JNR lines, at least for few years. Today, Sanriku Railway depot is located here. For Kitasanriku station, I'd like a similar feel of two stations merged into one, old tracks mixed with modern ones etc. I started with a research about how Sanriku stations are organized nowadays. Here are track plans (using Tomix rails) of their main four stations. Green are JR tracks, red are Sanriku Railway tracks, yellow are tracks common to both of them, and blue are IDR. Sakari station is their southernmost station, shared together with JR and Iwate Development Railway (IDR). The track plan shows the status before 2011 earthquake, since then the JR tracks were replaced with BRT. There are two JR tracks with platforms, but only one Sanriku Railway one. JR spurs (?) are located at the far end of the station, while Sanriku Railway ones are closer to platforms and include depot facilities. Some tracks are accessible only via several shunting movements. Through trains can use only one platform that belongs to Sanriku Railway. Both railway companies can operate their parts independently, there is only one common turnout. IDR has pretty large station, but their tracks are not connected to the rest of the station anymore. Platforms: JR 2, Sanriku Railway 1, IDR 1. Kamaishi station is next station of Sanriku Railway Rias line. It used to be a terminus station for Sanriku Railway from right and also terminus station for two different JR lines on the left. Because of that, there is a separate platform at top right and Sanriku Railway is connected with the rest of the station only via topmost platformed track, number 4 (it is not possible to go from right to green tracks on top). When the line to Miyako was transferred from JR to Sanriku Railway, the operations had to change and both companies had to fit into the station. Sanriku Railway got track number 4 (topmost one) for through service and both companies share track number 3 which is used by Sanriku Railway mostly for services that terminate here on their way from Miyako. Through service between JR line and Miyako can use any platform, through service between JR line and Sakari must use platform 4. Both companies must cooperate when operating the station. Platforms: JR 3, Sanriku Railway 3. Turntable is used for SL Ginga. Miyako station is next one. One again, it used to be a terminus station for Sanriku Railway, from left, and a through station of a JR line. Sanriku Railway used platform 0 (top left) for most of their operations, the rest of the station belonging to JR. Since the line to Kamaishi got transferred from JR to Sanriku Railway, the layout changed significantly. You can still see that the core part of the station used to be two tracks with Y turnouts and side platforms. To make both these tracks accessible from Kuji, the bottom track was broken off and new turnout was put in. More turnouts got removed on both the right side and the left side of the station, to separate two dead-end tracks of JR from depot track of Sanriku Railway. Through service can use only Sanriku Railway platforms. Both railway companies can operate their parts independently, there is only one common turnout. Platforms: JR 1, Sanriku Railway 3. And finally, Kuji station. Some info has already been written above. Even though Sanriku Railway has an island platform, the top track is not accessible from Miyako and is used only as a spur, there is a railing on the platform. Through service can use only JR platforms. Both railway companies can operate their parts independently, there is only one common turnout. Platforms: JR 2, Sanriku Railway 1. The stations are common to two companies, all the stations have at least one connecting turnout so through service is possible, but most of them have separate parts for each company. There are usually side tracks for car storage, Sanriku Railway has depots in some of their stations. Because Kitasanriku Project is already ongoing, there are some limitations to take into account, some of them pretty major. Module size is already set in stone, and also platform layout and station building are already prepared. The station has one island platform with a dead-end platformed track in the middle. The dead-end platform and one of the main tracks will be used by Sanriku Railway, the other platform track will be used by JR. It's an automation exercise so there are dedicated places for Tomix 5567 sensors. As the number of platforms is pretty tight, there should be some spurs for train storage. The modules can also fit a depot, filling station tracks, inspection track etc., whatever spare I find in my inventory to liven up the module. Let's have a look at the base track plan that shows elements that are already fixed. I went through multiple iterations of the layout based on all the requirements. There are some clear favorites but nothing stands out as "the best plan". Let's have a look. The main part of the station track layout is the same as in JNR era, but there is a new depot at the bottom and some new spurs to store vehicles of both JR and Sanriku Railway. Because of tight place imposed by footbridge, the depot is divided into right part (depot building with inspection tracks, wheel check machine) and left part (filling tracks, cleaning track, inspection tracks). There are some crosswalks where possible for station staff. Through service can use both tracks around island platform. The turnout just next to the small platform is problematic but I've checked that all Sanriku Railway cars do fit there, although it's very close, like less than half a milimeter. This one tries to solve the problem of turnout next to small platform, now there is a lot of place for the train to pass around. Depot and utility tracks switched sides, depot building is now on the left. This depot variation is my favorite so far. Variation of the right part that removes the connection between red and green tracks. Green spur is now longer, but the long track that goes from the small platform is now weirdly long. Maybe flip the double turnout? The right side is now pretty plain at the entry to the station, but maybe that's a good thing? Let's say the entry turnouts got rebuild when the private railway got its part of the station. 7.8/10 Too much curves. Left side of the station went through many iterations as well. There are some that are deemed acceptable, but have depot on the other side of the station. I've also tried to break up the connection between red and green sides here, but it seems quite unnatural. I mean, who would make a dead-end platformed track just next to utility spurs? Two different Y turnout layouts, both of them are very similar to the layout above but lack the symmetry of two tracks flowing around island platform. Also sensors next to the platform are dangerously close. This is yet another example of disconnected red and green parts. I quite like this, there are a lot of sidings for storage of many trains, yet it gives a feeling of a station that had a different layout in the past due to the unusual green entry through Y turnout. The only problem is that one of the red spurs does not fit a sensor on the right side of the crosswalk. I can use Tomix 5558 sensor but it is more unreliable than the 5567... On the other hand, it might be fine to have one of these on the layout as well to be able to test integration of different sensor types. Let's have a look at the right side again. What if platformed tracks were assigned the other way around and there was a dead-end at the green track? Even though it looks interesting, based on Miyako station, it is not practical for this project. To move trains from platformed track to depot, the train has to shunt outside the module which might make wiring and automation more complicated. The first layout has weird connecting track above small platform, the second layout would require making the filling & inspection tracks shorter which is not desirable, the two latter layouts have a S curve en route to the depot - might be a remnant of original layout of the station? Looks cool, but does not solve the problem with shunting outside the module. To sum it up, I've still not decided which way to go - the more spurs, the better? Or keep it simple? Where to put the depot building - does it matter that the turnout next to the small platform is problematic? Do I want to have connection between both companies on both sides of the station or just one? Given all the limitations and problems, so far, this is my favorite layout. Let's hope I do not find some new problem with this one... 😄 Edited August 1, 2022 by katem Fix image alignment 2 Link to comment
Martijn Meerts Posted August 2, 2022 Share Posted August 2, 2022 These days I tend to be a bit more of a 'keep it simple' person (which doesn't really show in my layout plans...), but I do also like large and / or busy stations. What you could do, if you have (most of) the track available, is do some test setups and see how it actually looks built up, rather than just on the computer. Computer track plans are great, but often once you see the actual physical layout, it either doesn't work, or works better than expected. If you don't have the track, you could even just use cardboard or paper to simulate the track, and still be able to set down some trains on it to get a quick idea of how things would look. Personally, I quite like the first one. 1 Link to comment
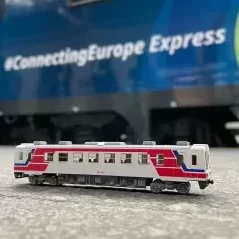
katem Posted August 8, 2022 Author Share Posted August 8, 2022 On 8/2/2022 at 10:21 AM, Martijn Meerts said: What you could do, if you have (most of) the track available, is do some test setups and see how it actually looks built up, rather than just on the computer. Computer track plans are great, but often once you see the actual physical layout, it either doesn't work, or works better than expected. I followed your advice and after a quick railway drawer inspection I found all the pieces needed (or a suitable replacement) for the whole plan and beyond. You are right that there is always something that is not visible in the track plan only. In my case, building the layout physically made me realize and change some parts that I describe below. For now, the plan looks like this: As already said, turnout just next to the small platform can't be moved to the right because trains would not fit. It also can't be moved to the left, otherwise sensors would not fit. This makes the position of this turnout set in stone. Green spur tracks at top right were both too short to accommodate three (top) or two (bottom) Kiha 110/111/112 cars. Because the station is going to be served by Tohoku Emotion 3-car train, it needs a place to rest at. Instead of ending rail E-LED-PC (Tomix 1427/1428) that is quite long after rails end (more than 4 cm), I'm going to use much shorter buffers that are just some wooden logs with a buffer sign that come from several different Tomix sets (1297/1298/91036). Just 12 mm, great space-saver 👍 This way, the two tracks are long enough to comfortably fit 3 and 2 Kiha 110/111/112 cars. Washing benches (marked with blue on the track plan) do not fit within half track spacing. I should have seen this in the track plan... Because of that, I moved the washing track to the left part of the station, adding a new depot track while removing two spurs. This led to an interesting question - what to do with the red platformed track on this side? When going through real station track plans and youtube videos, I noticed that in Miyako station, there is a platformed track that is dead-end, ends just before another track (it got disconnected by removing a turnout and putting a straight piece of track instead), and has shunting signs that allow one car to fit onto the piece of track outside platform. I tried to do something similar and in my opinion it turned out pretty good, there is now a feeling of a turnout that got disconnected between the red and green platformed tracks. Some photos from the tests, showing the layout version featured in the track plan above: 6 Link to comment
cteno4 Posted August 8, 2022 Share Posted August 8, 2022 Katem, excellent doin some test runs with actual track and cars! Always good to do as you find the gotchas you may miss in track planning software or just annoyances in 3D with cars on the track or even just how the scene looks more in 3D as even the 3D capable track planning programs don’t really give you the way it will feel. Also may catch some track geometry issues that some cars may be cranky on. good luck finding your sweet spot in layout design here. cheers, jeff 1 Link to comment
Recommended Posts
Create an account or sign in to comment
You need to be a member in order to leave a comment
Create an account
Sign up for a new account in our community. It's easy!
Register a new accountSign in
Already have an account? Sign in here.
Sign In Now