Welshbloke Posted August 6, 2015 Share Posted August 6, 2015 (edited) I've ordered one of the Kokuden 10-038 sets which seem to be a simplified version of a 103 Series, with the intention of doing some minor detailing such as painting on the chrome window frames and changing the couplers. Only thing is, I'm not sure which parts I need for the latter! I'd like to change them to the type seen on the higher spec 103 Series sets like 10-1193, am I right in thinking that those are Tightlock couplers like 11-703 and 11-705? Which of those two will fit in place of the factory-fitted rapidos? It looks as though 11-703 is right but I'd rather hear from someone who has done this swap successfully before placing an order. Edited August 6, 2015 by Welshbloke Link to comment
railsquid Posted August 6, 2015 Share Posted August 6, 2015 It looks perfectly possible. This blog post shows coupling exchanged for another type. BTW the KOKUDEN models are based on the tooling for the original version produced by Kato, dating from 1967 (!). 1 Link to comment
HantuBlauLOL Posted August 7, 2015 Share Posted August 7, 2015 How about the scale, is it exactly 1/150? Link to comment
railsquid Posted August 7, 2015 Share Posted August 7, 2015 (edited) No idea. They don't look out of scale. Here's a photo I took a while ago with a Kato Kokuden (top) and Microace 101 (bottom) to compare coupling lengths (before fitting the Microace 101 with Tomix close couplings; even for me the Microace had a ridiculously large gap). As far as I can tell the cars look the same size, at least no obvious discrepancies. Edited August 7, 2015 by railsquid Link to comment
kvp Posted August 7, 2015 Share Posted August 7, 2015 Yes, i also have one. The detailing is not as nice as a Tomytec train collection one and the parts are a bit loose (i had to glue in a few things to keep the motor from going through the roof), but it's ok if you can put it together right. The scale is the same as the Tomytec and Tomix HG sets. The motor is not as nice as a Tomytec one and much worse than a modern Tomix, including a very high minimum radius and no trace of a flywheel. There is no place to mount body mount close couplers and other extras usable with the Tomytec sets. No detail parts at all and the plastic is somewhat lower quality than what is used for more modern sets, but very similar to the one used for the prepainted Tomytec building kits. It's good as cheaper base for modding if you can live with the sub Tomytec quality. (it's actually similar to east german Piko sets that were made 40 years ago and british ones from the 1980ies) Link to comment
railsquid Posted August 7, 2015 Share Posted August 7, 2015 Are you talking about the KOKUDEN sets released in the last few years, or the original Kato production version (with the old-style motor visible through the windows)? The current KOKUDEN sets are basic, but not bad at the price; the motor is a modern underfloor style and similar in quality to the Tomytec chassis; no glueing required. Link to comment
HantuBlauLOL Posted August 7, 2015 Share Posted August 7, 2015 Nice to hear that. It costs 80$ here lol, so I'm going to import it by myself. So there are 2 different kokudens? Link to comment
railsquid Posted August 7, 2015 Share Posted August 7, 2015 There are currently 4 or 5 colour variations available - all the classic Tokyo line colours. Link to comment
HantuBlauLOL Posted August 7, 2015 Share Posted August 7, 2015 No, I mean those with visible motor and underfloor motor.. Link to comment
kvp Posted August 7, 2015 Share Posted August 7, 2015 I have the modern kokuden release and yes, glue was needed since the parts were so loose, they kept falling off. In the motor car, the roof is what is keeping the window glass planes in and these in turn keep the motor in position, the weight of the car kept pushing the roof of, so the motor kept falling in. The reason for this self disassembling style might be large tolerances during production and the fact that it was meant to be repainted and then glued together properly. The motor is a low profile cardan drive one (similar to the low profile Tomytec motors), but the minimum radius is bad and there is no trace of extra weight and flywheels and the couplers are fixed, not the replacable kind used by Tomytec. No option for body mount couplers (or at least imitation couplers on the ends) either, while at the same time all Tomytec trains have the mounting tabs for both. The headlights are painted on, like many eary Tomytec sets, not the transparent light channel versions used on later models, that work with Tomix lights. The original 1968 version had an above floor full size motor like some microace sets built around 2000, but at least it had a better turning radius and more weight for traction. Personally if i had to choose, then i would say Kokuden < Tomytec < Tomix < Tomix HG. (the Tomytec ones can be upgraded to Tomix and Tomix HG quality with additional parts) The only good points of the Kokuden sets are the cheap price and the availability, since unlike Tomytec sets, kokudens are available continously and everywhere in ready to run sets. Link to comment
Welshbloke Posted August 7, 2015 Author Share Posted August 7, 2015 Hmm, the one video I've seen of these sets made them look much better than that! The couplers look like standard rapidos with the coil spring behind them, which aren't impossible to change by any means. Apparently mine is having to come from Japan as the shop is out of stock, so it'll be a few days. Might make a video review of it as there's no English-language content on Youtube featuring them. Link to comment
railsquid Posted August 7, 2015 Share Posted August 7, 2015 Yes, what kvp describes doesn't sound quite the same as either of the two sets I've got. On mine the motor is held very firmly in place by the "floor", and copes fine with 243mm radius curves, which is the minimum I'd want to use cars of that length on anyway. The bodies are a little on the flimsy side but so far show absolutely no signs of falling apart or otherwise requiring repair. They are of course very basic models but I don't think that's news to anyone. FWIW here's a shot of the underside of a bogie on the power car: Link to comment
Welshbloke Posted August 7, 2015 Author Share Posted August 7, 2015 Ah, I won't try them on the 183mm curves in the CV3 pack I bought a couple of weeks ago then... :evil4: Basic doesn't worry me, a bit of paint and new couplers will work wonders IMO. From my reading of somewhat dodgy machine-translated Japanese on Hobbysearch these were intended to get newbies in, combined with an M1 set (or a V5/V6 and a controller) you could be up and running in N for about £100. Link to comment
railsquid Posted August 7, 2015 Share Posted August 7, 2015 That's exactly the reason I bought one, as I wasn't sure about this whole N-gauge thing and it was cheap enough to write off if I didn't like it or it turned out to be as awful as the OO gauge stuff I remembered from my youth. Anyway I spent many happy days running it back and forth on a small piece of track being generally delighted by its running qualities and looks. Remember, at that point I had no idea about the detailng, fancy LED directional lighting etc. which is standard these days... I've got a Japanese magazine detailing how to do these up, which I'll have a go at - probably in a few year's time at the current rate. Link to comment
railsquid Posted August 8, 2015 Share Posted August 8, 2015 Ah, I won't try them on the 183mm curves in the CV3 pack I bought a couple of weeks ago then... :evil4: Actually I just placed the power car on a Tomix 177mm curve and it looks like it would traverse it. I'll see if I can power it up later. Link to comment
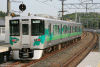
katoftw Posted August 8, 2015 Share Posted August 8, 2015 (edited) I actually have thought about getting some of these for running in shows. At 4,000 yen, they are cheap. They are all bright coloured expect the Emerald coloured train. Use them to limit the running time of the more expensive and irreplaceable models. Edited August 8, 2015 by katoftw 1 Link to comment
railsquid Posted August 8, 2015 Share Posted August 8, 2015 I actually have thought about getting some of these for running in shows. At 4,000 yen, they are cheap. They are all bright coloured expect the Emerald coloured train. Use them to limit the running time of the more expensive and irreplaceable models. There's a Japanese layout "Hironocho" on the UK exhibition circuit which uses them, see e.g here and here. BTW apart from the lack of flywheels, they don't have traction tyres, so the power car won't pull much beyond the three car set. 1 Link to comment
Welshbloke Posted September 2, 2015 Author Share Posted September 2, 2015 Well, my yellow Kokuden arrived today. Not yet had a chance to run it, but first impressions: The paintwork is simple (no chromed windowframes, white destination boards or red tail lights) but what's there is crisp. Lettering is up to the standard of their normal range, the non-functional headlight is painted silver. I may try to do some detail painting but I'm worried about making things worse if I can't get it spot on, the inset square windowframes especially would involve applying silver paint to a strip about the thickness of a cat's whisker, without getting it on the yellow bodywork right next to said strip. Wheels look good - they're metal and blackened. Couplers are standard rapidos in spring mounts. I'll probably order some of the Tightlock type to replace them with eventually. There are no interiors. It wouldn't be difficult to make something representative though, using card for partitions and small blocks of styrene for seats. Or it might be possible to get hold of the interiors from the "full fat" 103 Series model and fit them. Build quality feels good. The bogies are fitted with the old-style clip pegs rather than screws, so they wobble a bit when you pick the coaches up but sit squarely when on the rails. They certainly don't feel as if they'll fall apart if shaken. Assuming the running is up to the usual standard for Kato low-profile mechanisms then I'd strongly recommend them! Link to comment
railsquid Posted September 2, 2015 Share Posted September 2, 2015 There are no interiors. It wouldn't be difficult to make something representative though, using card for partitions and small blocks of styrene for seats. Or it might be possible to get hold of the interiors from the "full fat" 103 Series model and fit them. Mine have (at least the green one does) bench seats in the non-powered cars, kind of hard to see though unless you look through the end windows. Link to comment
Welshbloke Posted September 3, 2015 Author Share Posted September 3, 2015 Just had another look, they do indeed! I think the lack of any partitions other than the back wall of the driver's cab is what threw me, the real thing must have handrails or something of that nature inside for standing passengers to hang onto. Link to comment
railsquid Posted September 3, 2015 Share Posted September 3, 2015 Yes, they'll have the classic Japanese commuter carriage layout - bench seats and handrails with grab handles along the train on each side in front of the seats. Link to comment
kvp Posted September 3, 2015 Share Posted September 3, 2015 You can add vertical handrails and paint the floor but most items just under the roof is not really visible through the windows. Link to comment
Welshbloke Posted September 3, 2015 Author Share Posted September 3, 2015 Ahh, thanks for posting that! I was wondering if there were any partitions around the doorways (as you normally get on British trains) but it looks as though everything apart from the seats is a handrail. I might just add some passengers, that'll distract from the sparseness. Link to comment
Welshbloke Posted September 19, 2015 Author Share Posted September 19, 2015 Double post, but I think I've just found what kvp meant about the Kokuden sets having problems... Do not, under any circumstances, try to open your Kokuden EMU set out of curiosity. I popped the bodyshell off my KuMoHa today and it turned into a puzzle. The body is lightly glued to the chassis, which holds it at the right height and level. The glazing is then fitted inside the shell, hooking over clips on the chassis. The roof is held in place by clipping it into the top of the glazing. When you break the glue joint you'll find it very difficult to get all the parts back together solidly. I managed it by fitting the bodyshell, then slipping the glazing in, then the roof. The usual approach of fitting the body, glazing and roof as one assembly to the chassis doesn't work, either the shell will end up sitting too low (or not level) or the roof will pop off. I'm loath to use more glue as it'd be very difficult to strip the chassis down for servicing at a later date. The basic problem is that the glazing is smooth, rather than fitting into the apertures in the shell as the more expensive models do. For that reason it can't stop the shell from moving vertically in relation to it. There are tabs to stop the shell slipping down over the chassis, but they don't work as well as they should. The bodyshell is very thin and prone to bowing outwards in the centre, which also doesn't help. Link to comment
Recommended Posts
Create an account or sign in to comment
You need to be a member in order to leave a comment
Create an account
Sign up for a new account in our community. It's easy!
Register a new accountSign in
Already have an account? Sign in here.
Sign In Now