All Activity
- Past hour
-

ED75's Random Japanese Trip Photos
cteno4 replied to ED75-775's topic in Travel: Tips, Planning & Memories
Wonderful you got to video chat with your grandfather while there, very special treat for you both! Ive visited Wright buildings all over the world while traveling and spent a couple of days in oak park and other chicago areas visiting houses and of course his house. As you note his spaces are very contemplative. His style does take a lot from the japanese aesthetic and woodworking. His use of woods and wood finishes is just awesome. Always a number of great places to sit in his architecture. His one weak point was engineering at a times though. I remember walking across the living room area at fallingwater the first time i visited and getting a tad disoriented thinking it was just the perspectives [he plays with perspectives in the spaces and views] but it was the fact the room sags quite a bit. It’s been fixed now with better supports. But its funny how when your brain is expecting flat it goes tilt when its not but outside we never notice the ground is going up and down all over the place when we dont expect it to be flat! Jeff - Today
-
@Keisarikonen no I mean real wood veneers. The plastic shelf paper stuff really does not look very good, is easy to ding up, and it slowly wrinkles with time. I get rolls of it, it comes in like 25, 50, 75mm widths and you either glue it down or iron it on with a clothes iron [some come with heat sensitive glue already applied to one side]. Even the big ttrak faces are at most a dollar a face. I dont bother facing module ends, just the front and back sides that are visible. I put it on hanging over most edges and then just trim off the extra with a trim router and a flush cutting bit. But you can also trim off excess by hand with a matte knife, just takes some time and care. This is nice as it covers up all the joints on the edges. The new cnc/lasercut modules this is really a problem as the faces are singed badly with a lasercutter and even with cnc the edges showing of the ply gets really noticeable and distracting for a framing element. Also lets you be lazy with all the joints a bit as any little gaps or edges showing will get covered up with a nice clean edge. Total cheat but gets a really nice finish that always makes the viewer kick their overall impression up a notch for you. Ask around to any woodworkers you may know or your local wood places, they may have something there or can help you find where to order some in Finland or not too far. You can finish as you like. I usually just rub it down a few times with Tung oil [50% tung oil 50% lemon oil is my oil of choice, really versatile and doesn’t smell bad], but any decent rub on oil finish works nice to protect it. A few days later i usually rub some bees wax onto the top as it gives and additional layer of protection and a nice surface luster to the wood. Simple stuff to apply with a rag and a little rubbing. Lasts years and easy to just reapply some if it gets dried out with time and conditions. Varnishing with a lacquer or polyurethane [new water based stuff is easy to apply and not smelly] works as well if you prefer a surface finish. I would stick to a flat or satin finish as gloss finishes can catch light oddly on smaller pieces and usually just doesn’t look at that good on a framing piece. Varnishing will protect the surface well from doing weathering and such on the model, but i usually just tape off parts when doing stuff like that or you can apply the veneer once messy scenery stuff is done. For modules that have an uneven top surface that is cut off in profile you can always just trace the profile onto a piece of veneer and then go at it with a rototool and a burr bit to get it roughed out. Then apply to the side and finish up with the rototool to get it into a perfect profile. Its just a really nice finishing touch to a beautiful module for presentation. i do museum exhibit work and we always use natural wood finishes around artifact cases and such as they just work so much better to the eye in framing and not distracting at all. Our monkey brains just reflex accept natural wood but always hangs on plastic, painted, and metal finishes in situations like this. Paint/Plastic colors are also a real problem as no matter what color you pick like a quarter of the viewers will just not like it! Painting a framing area black does not make it go away as the urban myth says it does in a situation like this, it actually just draws bad attention to it and thus away from and degrading the module scene. That sort of color issue does not come up with a natural wood finishes. I tend to go for a medium wood with a bit of grain like cherry as it has a hint of color [redish] without being loud and a bit of grain that is not super contrasty and its pretty tough with dings if banged into. I stay away from oak as its grain can be a bit too strong and it does not take finishes quite as well, nor staining if you want to add a bit more color to it. Birch works and can be tinted some, but its a bit boring to me if only a bit showing. Just a thought. cheers jeff
-

Asian Manufacturers - Product Announcements
jingpeng replied to disturbman's topic in Worldwide Models
I don't have so much experience and background history in Changming models, but I found the Pantographs were the Achilles heel of these beautifull models.The switch to metal should be be a great improvement -
Asian Manufacturers - Product Announcements
jingpeng replied to disturbman's topic in Worldwide Models
I'd like to have one of these sets. The age of these coaches match perfectly the era I want to model -
ED75's Random Japanese Trip Photos
ED75-775 replied to ED75-775's topic in Travel: Tips, Planning & Memories
While my trip to Meiji-Mura was ostensibly for the steam trains, there's actually one other reason I ended up going. Graeme has already provided a spoiler as to what that is: it's the lobby of the former Imperial Hotel, designed by the great American architect and Japanese art aficionado, Frank Lloyd Wright. Built between 1919 and 1923 in Wright's 'Mayan Revival' style, the hotel was designed to be as earthquake-proof as possible, which it demonstrated - albeit with some small damages - during the Great Kantō Earthquake of 1 September 1923. Unfortunately for the hotel, it was one of those very earthquake-proof features which led to it being condemned. The shallow floating foundation was supposed to spread the building's weight out but instead failed to provide enough support and stop the building from sinking into the alluvial mud present on site. While there was talk of demolition and renewal as early as 1936, it would hang on until 1967. Following public outcry over the loss of Wright's iconic building, plans were set in motion to rebuild the hotel's lobby at Meiji-Mura, utilizing the finishing elements from the original structure which itself as a brick and concrete structure would not be able to make the journey. All of the pieces had arrived in Inuyama by March 1968; reconstruction of the exterior formally took place between 1970 and 1976, followed by reconstruction of the interior between 1983 and 1985. It's a wonderfully contemplative space to wander through or maybe have a cup of tea at the tearoom on the second floor. Now, I'm going to have to come clean: I'm not an architect. I am however a fan of architecture, which may have been helped by the fact that my maternal grandfather was a professional architect before he retired in the late 1990s or early 2000s. He very kindly gifted me a few books from his collection some years ago, including his copies of Sir Banister Fletcher's A History of Architecture on the Comparative Method and Nikolaus Pevsner's An Outline of European Architecture, to name just two. Knowing his interest in Wright's work (he's said at least once that Wright is an excellent example of an architect to study), I ended up video-calling him on holiday in Auckland while there, just to show him where I was, which he deeply appreciated. Alastair
-
KATO C30-7 REMOTOR Third attempt proved successful. The motor mount fits like a glove. Motor is friction fit. Tomorrow will solder leads to the motor. Then the daunting task of removing the flywheels. Have the mini gear remover and have done it before. Hope the pin is still good...
-

Ikonen's Finnish N Scale Project Diary
Keisarikonen replied to Keisarikonen's topic in Layout Building
Did you mean these plastic wood finishes? Truthfully I havent considered it, yet it seems like an interesting choice to use these plastic wood veneers. Is it necessary to lacquer the veneers tho? -
ED75's Random Japanese Trip Photos
ED75-775 replied to ED75-775's topic in Travel: Tips, Planning & Memories
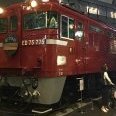
Apart from the trams, Meiji-Mura does have a few railway exhibits on site, including three steam locomotives. This is the largest and easiest of the trio to find, Bisai Railway No. 1, displayed in front of the former Rokugo River railway bridge section. Built by the Brooks Locomotive Works of Dunkirk, New York in 1897, this 4-4-2T locomotive was used on what is now the Meitetsu Bisai Line during its service career. Coincidentally, it would also work alongside one of the museum's other locomotives during this time as well. Retired in 1935, it was sold into industry and worked at a factory in Niigata Prefecture before entering preservation. Brooks products weren't particularly common in Japan with just ninety-one locomotives purchased from that manufacturer between 1896 and its incorporation into ALCo in 1901, mostly one-offs for private railways although the Japanese Government Railways and its predecessors did purchase a few as well. So far as I'm aware, this is the only survivor of those ninety-one. It's too big for the Meiji-Mura railway, and given that it's been stored outside for decades, I wouldn't be prepared to bet that it's in all that good a condition. But it exists, the cab is open to visit, and perhaps that's more than enough for this old-timer. Fun fact for the uninterested: Doing a little research for this photo travelogue, I came across a website featuring both a photo of Bisai No. 1 in its original condition, as well as photos of a few of the company's other Japanese products. Check it out here. Alastair
-
ED75's Random Japanese Trip Photos
ED75-775 replied to ED75-775's topic in Travel: Tips, Planning & Memories
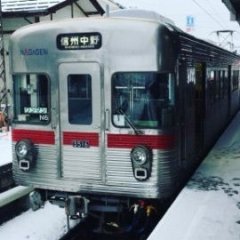
Heading slightly further into the museum grounds, we find the first of the rail exhibits at Meiji-Mura: the tramway. Commencing operation in 1967, the Meiji-Mura tramway features two 3'6" (1067mm) ex-Kyoto City Transportation Bureau trams, N58 (No. 1) and N115 (No. 2), operating over what I'd estimate to be about three kilometres of track. On the day of my visit, N115/No. 2 was in service, seen here at the middle tram stop. While at least eight of these narrow-gauge trams have survived into preservation, Meiji-Mura's examples are the only ones still running in Japan. Fun fact for the California-based members of this forum: trams N17 and N19 were sold to the Orange Empire Railway Museum (now the Southern California Railway Museum); SCRM still lists N19 on its fleet roster but there's no mention of N17. Also on site at the time, but not part of the Meiji-Mura collection, was former Sapporo City Transportation Bureau tram 22. This tram began its working life in 1901 in Nagoya, but was later sold to Sapporo in 1907 and ran there until the 1930s. Held for preservation, it was returned to working order in 1960 but last ran in 1977 and was then retired to the Sapporo City Transportation Museum. Its visit to Meiji-Mura was originally arranged in 2013 as part of the museum's fiftieth anniversary celebrations, in which it was planned to restore it to working order once more and operate it on the museum's tramway. That plan fell through when it was found that certain parts had become seriously deteriorated, resulting in 22 being placed on static display in a shed close to the former Sapporo Telephone Exchange building. The original loan called for 22 to head home in 2020 but that was extended out twice, with the tram finally heading back to Hokkaido in September 2023, just a few months after I saw it. Note also the wacky lifeguards fitted to these trams, which are jarringly large but very necessary during the rapid modernization of the Meiji era when people would have been considerably less concerned about being hit by vehicles - until they were! Alastair
-
Yes, you just walk through.
-
This reminded me of a question I have. If you have a pass that is just a ticket, like the JR East ones for example, what do you do at unmanned stations that only have IC card stands? I mean the ones without gates, where they just have a pedestal with an IC card touch pad on it, and no staff. I don't think they have anywhere to put the ticket in. Presumably you just walk through.
-
KATO C30-7 REMOTOR Restarting this project to remotor to coreless. The current motor does require quite a bit of power to start moving. I added a capacitor to assist. This loco is the one that I use to push the Tomix vacuum car around. It actually may be better to leave this one alone as the higher voltage is actually good for the Tomix vac, but I had put a coreless in that one already and it spins very high anyway. Motor is a 816 that I got from ebay. Shaft is 1mm while the Kato motor is 1.5. I got the shaft adapters from Tramfabriek a while ago and they fit perfectly. I just need to remember not to push too hard on the shaft or I will kill the motor like I did back then. Designed a 3D motor mount to fit inside the plastic cradle. The power leads will run on the outside of the mount and will touch the frame halves.
-
Thanks, I’ve stayed at Hirafu Station Guesthouse a couple of times, will have to see if we can get to Futamata-Honmachi on a future trip.
-

Kato D51 (1-203) - Issues and Reviews
kusojiji replied to Kamome's topic in Japanese: Other Gauges & Scales
Ok, I guess the museum is long gone since I cannot find it. That's a bummer I never heard of it. Had been going to Sasebo from '94 to '21. -

Asian Manufacturers - Product Announcements
disturbman replied to disturbman's topic in Worldwide Models
Changming will be releasing a new and updated model of their HXD1C (which explains why they were on display at Beijing): some details have been refined, made smaller. The big update seems to be the pantograph which is now made of metal-etched parts.
-

Kato D51 (1-203) - Issues and Reviews
wazzd replied to Kamome's topic in Japanese: Other Gauges & Scales
Kusojiji, It was at the "Transportation Museum Park"....which was a little bigger than the Loco itself, tucked away in a corner in Sasebo City, apparently only until 2019. I do have some photos ..I'll post em when I find where I put them. 😁 - Yesterday
-
Diary of a 26" x 14" H0e Forest Layout
mags_minibuilds replied to mags_minibuilds's topic in Layout Building
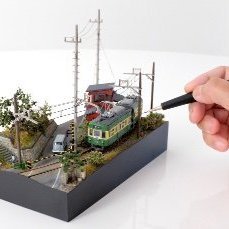
Planted all the trees into the diorama, no more toothpick placeholders. Added some mini trees/bushes made out of seafoam trees and Noch leaves, a technique that was derived from Modellwagen. The scenic elements are at a good stopping point so I'll start building up the scene on the dirt ground.
-
People’s Republic of China N Scale trains
Section31 replied to gavino200's topic in Worldwide Models
@disturbman Thanks. I was looking for those, i will pick them up from you closer to when the CR400AF-Z delivers. -
Kato D51 (1-203) - Issues and Reviews
kusojiji replied to Kamome's topic in Japanese: Other Gauges & Scales
Yep, definitely! -
IMON just put a big load of second hand HO up in its new releases list, no photos yet but the prices seem reasonable https://www.imon.co.jp/webshop/new-item
-
I also took some pictures of some steps of the conversion
-
Kato D51 (1-203) - Issues and Reviews
disturbman replied to Kamome's topic in Japanese: Other Gauges & Scales
That's more or less the assumption we had all reached. Which really put in question what happened with this model for so many issues to have surfaced. The fact that Masaharu also took the step to remedy issues on models, or sent them back to Kato, says a lot. I think he is a great source to introduce people to servicing, he always was very clear on the stepped to take and what to do. And his 3D modeling projects were very interesting/entertaining as well. I wish he would make more of these and resume his "salvage or scrap" series. -
People’s Republic of China N Scale trains
disturbman replied to gavino200's topic in Worldwide Models
@Section31 by "standard NEM coupler" do you mean Rapido couplers? Kato andTomix don't do anything NEM, but they use Rapido couplers. If that's the case, Changming has them, but we are the only one to retail them. They use to pack a pair inside the box of their early locomotives, but they stopped doing so a while back. When they more or less released what I call their 3.0 locs. -
On the P70 wagon it's not so difficult. I have to: Remove the bogies and the frame Unscrew and remove the original Changming coupling File down 0.5 mm on each side where the original coupling was screewed (the NEM pocket width is 1 mm larger than the Changming "box") Put a small amount of cyanoacrylate glue to glue the Dapol NEM pocket Wait a bit to let the glue set Insert the Dapol coupling in the NEM pocket Make some test Screw the bogies and refit the frame on the chassis That's all. It seems a lot of work, but it's not really such an hard job
-
Kato D51 (1-203) - Issues and Reviews
cteno4 replied to Kamome's topic in Japanese: Other Gauges & Scales
That does look like a production error. jeff