All Activity
- Past hour
-

Asian Manufacturers - Product Announcements
disturbman replied to disturbman's topic in Worldwide Models
Changming TaoBao price should be be around 70 to 75 USD. These are likely to stay available from there since this is their third production run and CM has been increasing their production size. But being in the US, you will have to pay a proxy service to order one directly from CM. So add 10% fee, plus domestic shipping and international shipping. Models should be available from Hong Kong retailers at a very slightly higher price than TaoBao, or from Tekkon in Japan for an even higher price. So depending on actual import avenue, model should cost you around a 100 USD to 110 USD to import (before tariffs). Regarding the detailing, it's the level you expect from Changming and that they have been putting out. First generation models were already very well detailed, with crisp printing and fine details, but the quality (and price) has increased since. If you are interested in testing Chinese trains, I think you will be happy with a CRH model. - Today
-

Tomix - New Releases
Little-Kinder replied to bill937ca's topic in New Releases & Product Announcements
The JP post seems to be a reskin of the Konbini..... Same issue with the bank, I never saw banks or Jp post looking like this (at least around where i live) This feels very lazy from tomix
-

Kato slotless motors magnets effecting Tomix points
BarryinSac replied to cteno4's topic in Track Systems
I tried this method, but I had used iron foil https://a.co/d/fSrIETQ It didn't work quite well for me. It seemed the magnet in the switch was so attracted to the Iron that it would not throw or close just click. Should I be looking for a non-magnetic type metal or something else? -
HELP !!!!! I have done a little, i have managed to get the lift out bridge section cut and track glued and wired ( photo's attached ) What i am having trouble getting my head around is the wiring for the DPDT switches for the block sections, no amount of googling or reading seems to come up with a simple drawing or explanation for how to wire these for DC analogue model railway, i have Evan purchased the Atlas wiring book but it is for common rail wiring, also everything i can find seems to wire both controllers together. I have one control for the outer track and the other for the inner. Any way could someone ( Jeff where are you lol ) point me in the right direction on which wire goes where on the DPDT, i have added a photo of what im looking at, i was hoping it would trigger something in my head but nothing happened lol. I am looking at this now while im drilling and placing wires, and yes i will glue only when everything is wired and running properly. But at the moment it is the Block section wiring i am concerned about and sidings
-
ED75's Random Japanese Trip Photos
ED75-775 replied to ED75-775's topic in Travel: Tips, Planning & Memories
Time to start heading back to Nagoya again! To paraphrase from my 2023 travelogue, "While I enjoyed my time there, I got the feeling that this wasn't entirely 'my' kind of museum. It was still worth going though." So, to wrap up this diversion, have some random Meitetsu photos from Inuyama. Also from the bus trip back to Inuyama, ooh, big Greenmax building! Alastair
-
ED75's Random Japanese Trip Photos
ED75-775 replied to ED75-775's topic in Travel: Tips, Planning & Memories
Having arrived at 'Nagoya' (nothing here other than the northern tram terminus) the locomotive runs round the train. While Meiji-Mura does have turntables at each end of its railway, they weren't being used on the day I was there and the locomotive was running the return trips to 'Tokyo' bunker first. This locomotive has had an interesting past, having been built in 1874 as A7-class locomotive No. 23 for the Tokyo-Yokohama railway. Later renumbered into the 160-class as No. 165, the number it would carry until sold to the Bisai Railway in 1911. It wasn't retired until 1957 but was kept to one side for preservation, initially at the present-day Inuyama Monkey Park (1963-65) and later as a static display at Meiji-Mura. It was returned to working order in 1972 for the centenary of Japanese railways, and put into regular service at Meiji-Mura in 1973. Other than a few gaps during major inspections and overhauls, including the replacement of its boiler in 1985, it's remained in use here ever since. Alastair
-

Bill's Excellent Swiss Adventure
EdF replied to bill937ca's topic in Travel: Tips, Planning & Memories
Really great live came of the approach to the station. Zurich live cam -

Bill's Excellent Swiss Adventure
bill937ca replied to bill937ca's topic in Travel: Tips, Planning & Memories
I found a floorplan of Zurich HB. The open area to the right is the old station of 1871. It is just open space now and used for special events like an annual Christmas market. -
ED75's Random Japanese Trip Photos
ED75-775 replied to ED75-775's topic in Travel: Tips, Planning & Memories
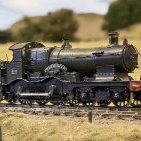
The Imperial Hotel lobby is just a short distance from another of Meiji-Mura's attractions, and perhaps the one I was most keen to experience: the railway. The museum has a short railway over which it operates two steam locomotives on a regular basis. Having heard a very shrill whistle echoing across the grounds, I'd hoped that Sharp Stewart-built 2-4-0T No. 12 would be running that day, and it was. I arrived with just enough time to buy a combined train and tram ticket, before jumping aboard for the next trip from 'Tokyo' to 'Nagoya'. It's not a long journey, taking about three to five minutes from end to end, and you don't exactly see much other than the woods around the rail line except when you cross the brick viaduct just beyond 'Tokyo' when you get a brief view of the historic buildings down to Lake Iruka. The train comprises three ex-Ogachi Railway HaFu carriages, clerestory-roofed HaFu's 13 and 14 originally from the Shingu Railway and the box-like HaFu 11 originally from the Ōme Railway. Of this trio only HaFu 11 was built during the Meiji era, in 1908; the two Shingu coaches were built in late 1912 and thus are actually Taishō era vehicles. In the background you can just see the two-road engine shed, which on this day was housing Fujiminobu Railway No. 9, a Baldwin 0-6-0T and the only locomotive not to have any connection with the Bisai Railway at Meiji-Mura. Last used at the Tsurumi Steelworks, it was still 'in ticket' at the time of my visit but would taken be out of service later that year pending overhaul. Alastair
- Yesterday
-
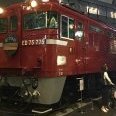
Couple new announcements from the 63rd Shizuoka Hobby Show. Hankyu 2000 Series, scheduled for release "this winter" Tec Station exclusive: JR ED76-1000 Series (Late Model, Sash Windows, JR Freight Renewal livery, silver door; according to Google Translate). Scheduled for release in Sept 2025. https://ngauge.jp/posters/hobby2025_tomix/
-
New Cambrian early arthropod species named after mothra because of its moth wing appendages. Etymology: From the name of the fictional Japanese monster, or kaiju モスラ (also known as ‘Mothra’), romanized according to Hepburn style, in reference to the moth-like appearance of the animal. Actually quite a number of species named after godzilla and other kaiju, one other mothra crustacean. https://en.wikipedia.org/wiki/List_of_organisms_named_after_works_of_fiction#Godzilla jeff
-
Asian Manufacturers - Product Announcements
Section31 replied to disturbman's topic in Worldwide Models
@cteno4 It looks like price will be listed on Thursday 8pm Beijing Time. I am waiting on final price to make my decision though. That and is it instock/preorder as i have to deal with potential Canada Post Strike. If it's an good price, i am seriously thinking about buying two of them with one as gift for my friend kid. -

Asian Manufacturers - Product Announcements
cteno4 replied to disturbman's topic in Worldwide Models
That is quite nice detailing and painting on that loco. Pantographs look actually to have a bit more detail to them than most japanese pantographs. They are coming along fast. What is the SRP on one of those? jeff -
Bill's Excellent Swiss Adventure
bill937ca replied to bill937ca's topic in Travel: Tips, Planning & Memories
Zurich Hauptbahhof is the main train station in Zurich. For SBB trains there are 16 surface level tracks, 4 underground through tracks with two platforms and a further 4 underground tracks with two platforms used by S-Bahn trains. On a workday 405,200 passengers pass through the station on over 3,000 trains. Its a great place to watch trains. Underground there were trains coming through about every 10-15 minutes. On the main floor trains pulse every 30 minutes. There has been a train station on this site since 1847. The current station with the triumphal arch dates from 1871. The current train shed was built in 1933 behind the 1871 trainshed, which is still there but used for food festival while I was in town. The underground tracks were added in the 1980s and later. SBB Station user stats https://reporting.sbb.ch/en/stations?=&years=1,4,5,6,7&scroll=2883&highlighted= The Man in Seat 61 has a good article on Zurich HB with lots photos. https://www.seat61.com/stations/zurich-hb.htm For those who want to know where everything is SBB has a great three dimensional plan. https://plans.trafimage.ch/zuerich-hb?lang=en&layer=zurich_innenplan&x=683178.42&y=248017&z=19.98117604498825 Photos: 1. Looking across the concourse on Tuesday morning. 2. Looking out along the tracks. 3. Across the tracks at a busy time. Thursday morning on arrival from Basel. All the electric locomotives was unusual. Usually the place is full of EMUs.
-
Asian Manufacturers - Product Announcements
Section31 replied to disturbman's topic in Worldwide Models
@disturbman Thanks. It looks largely similar and I have want the red themed ones (looks like far away releases) or the HXD1 Shen 24. -
I recently came back from five day adventure in Switzerland. I have been many mostly tram focused European adventures since 2011. I flew from Toronto on Swissair and stayed in Zurich for three nights, one night in Basel and another night in Zurich before flying home. My Swiss trip had a greater rail component than any previous trip. For getting around purchased a 6-day Swiss Travel Pass. Although pricey there is no need to be concerned with fare zones or buying tickets from fare machines. The Swiss Travel Pass is good on SBB (Swiss Federal Railway) trains, trams, inclines, boats. Alone in Zurich there are 37 operators. Usually my photography is about 50% trams and 50% buildings and general sightseeing, but two days of steady rain curtailed building photography and sightseeing. I ended up doing far more tram riding and repeated visits to Zurich Hauptbahnhof (main train station). My quest was to ride and photograph high-floor trains in Zurich which are becoming rarer and rarer as the march for accessibility marches on. I succeeded in riding three of the four groups I was targeting and photographing all four groups. While I was there I located one hobby shop and passed on visiting another because of its outlying location and the stormy weather. From Sunday noon until Tuesday noon there was two straight days of steady rain. I picked up a Kato Bernina Express Souvenir Coach Api 1301 which doesn't seem to be available in Japan. Kato #05250-9 Noch #7074061 My time in Zurich started with a quick 13 minute ride into the city on the IR75 (the first train that came along) from the airport. By 0730 I was in the city and checked into the hotel. More to come. Photo: Two SBB trains and a Deutsch Bahn train at Zurich HB.
-
Asian Manufacturers - Product Announcements
disturbman replied to disturbman's topic in Worldwide Models
The front shape of the HXD1C is rounder than the HXD3C/CA, which is more blocky and angular. The skirt of the HXD1C is also less angled than the HXD3C/CA. -
Asian Manufacturers - Product Announcements
Section31 replied to disturbman's topic in Worldwide Models
@disturbman I am thinking of picking it up too (it should be pretty cheap model overall) but i am wondering what is the major difference outside the top details versus the recently released HDX3CA models. The real life model is quite interesting. -
Asian Manufacturers - Product Announcements
disturbman replied to disturbman's topic in Worldwide Models
The pantograph of the first models would explode in pieces just by looking a them 😁 I can tell you, the current generation is already an amazing improvement. It makes sense that they try to still improve them to bring them to the same quality as the rest of the model, but at the same time, I don't think it was entirely necessary. They are already on par-ish with Japanese model pantographs. -
ED75's Random Japanese Trip Photos
cteno4 replied to ED75-775's topic in Travel: Tips, Planning & Memories
Wonderful you got to video chat with your grandfather while there, very special treat for you both! Ive visited Wright buildings all over the world while traveling and spent a couple of days in oak park and other chicago areas visiting houses and of course his house. As you note his spaces are very contemplative. His style does take a lot from the japanese aesthetic and woodworking. His use of woods and wood finishes is just awesome. Always a number of great places to sit in his architecture. His one weak point was engineering at a times though. I remember walking across the living room area at fallingwater the first time i visited and getting a tad disoriented thinking it was just the perspectives [he plays with perspectives in the spaces and views] but it was the fact the room sags quite a bit. It’s been fixed now with better supports. But its funny how when your brain is expecting flat it goes tilt when its not but outside we never notice the ground is going up and down all over the place when we dont expect it to be flat! Jeff -
@Keisarikonen no I mean real wood veneers. The plastic shelf paper stuff really does not look very good, is easy to ding up, and it slowly wrinkles with time. I get rolls of it, it comes in like 25, 50, 75mm widths and you either glue it down or iron it on with a clothes iron [some come with heat sensitive glue already applied to one side]. Even the big ttrak faces are at most a dollar a face. I dont bother facing module ends, just the front and back sides that are visible. I put it on hanging over most edges and then just trim off the extra with a trim router and a flush cutting bit. But you can also trim off excess by hand with a matte knife, just takes some time and care. This is nice as it covers up all the joints on the edges. The new cnc/lasercut modules this is really a problem as the faces are singed badly with a lasercutter and even with cnc the edges showing of the ply gets really noticeable and distracting for a framing element. Also lets you be lazy with all the joints a bit as any little gaps or edges showing will get covered up with a nice clean edge. Total cheat but gets a really nice finish that always makes the viewer kick their overall impression up a notch for you. Ask around to any woodworkers you may know or your local wood places, they may have something there or can help you find where to order some in Finland or not too far. You can finish as you like. I usually just rub it down a few times with Tung oil [50% tung oil 50% lemon oil is my oil of choice, really versatile and doesn’t smell bad], but any decent rub on oil finish works nice to protect it. A few days later i usually rub some bees wax onto the top as it gives and additional layer of protection and a nice surface luster to the wood. Simple stuff to apply with a rag and a little rubbing. Lasts years and easy to just reapply some if it gets dried out with time and conditions. Varnishing with a lacquer or polyurethane [new water based stuff is easy to apply and not smelly] works as well if you prefer a surface finish. I would stick to a flat or satin finish as gloss finishes can catch light oddly on smaller pieces and usually just doesn’t look at that good on a framing piece. Varnishing will protect the surface well from doing weathering and such on the model, but i usually just tape off parts when doing stuff like that or you can apply the veneer once messy scenery stuff is done. For modules that have an uneven top surface that is cut off in profile you can always just trace the profile onto a piece of veneer and then go at it with a rototool and a burr bit to get it roughed out. Then apply to the side and finish up with the rototool to get it into a perfect profile. Its just a really nice finishing touch to a beautiful module for presentation. i do museum exhibit work and we always use natural wood finishes around artifact cases and such as they just work so much better to the eye in framing and not distracting at all. Our monkey brains just reflex accept natural wood but always hangs on plastic, painted, and metal finishes in situations like this. Paint/Plastic colors are also a real problem as no matter what color you pick like a quarter of the viewers will just not like it! Painting a framing area black does not make it go away as the urban myth says it does in a situation like this, it actually just draws bad attention to it and thus away from and degrading the module scene. That sort of color issue does not come up with a natural wood finishes. I tend to go for a medium wood with a bit of grain like cherry as it has a hint of color [redish] without being loud and a bit of grain that is not super contrasty and its pretty tough with dings if banged into. I stay away from oak as its grain can be a bit too strong and it does not take finishes quite as well, nor staining if you want to add a bit more color to it. Birch works and can be tinted some, but its a bit boring to me if only a bit showing. Just a thought. cheers jeff
-
Asian Manufacturers - Product Announcements
jingpeng replied to disturbman's topic in Worldwide Models
I'd like to have one of these sets. The age of these coaches match perfectly the era I want to model -
ED75's Random Japanese Trip Photos
ED75-775 replied to ED75-775's topic in Travel: Tips, Planning & Memories
While my trip to Meiji-Mura was ostensibly for the steam trains, there's actually one other reason I ended up going. Graeme has already provided a spoiler as to what that is: it's the lobby of the former Imperial Hotel, designed by the great American architect and Japanese art aficionado, Frank Lloyd Wright. Built between 1919 and 1923 in Wright's 'Mayan Revival' style, the hotel was designed to be as earthquake-proof as possible, which it demonstrated - albeit with some small damages - during the Great Kantō Earthquake of 1 September 1923. Unfortunately for the hotel, it was one of those very earthquake-proof features which led to it being condemned. The shallow floating foundation was supposed to spread the building's weight out but instead failed to provide enough support and stop the building from sinking into the alluvial mud present on site. While there was talk of demolition and renewal as early as 1936, it would hang on until 1967. Following public outcry over the loss of Wright's iconic building, plans were set in motion to rebuild the hotel's lobby at Meiji-Mura, utilizing the finishing elements from the original structure which itself as a brick and concrete structure would not be able to make the journey. All of the pieces had arrived in Inuyama by March 1968; reconstruction of the exterior formally took place between 1970 and 1976, followed by reconstruction of the interior between 1983 and 1985. It's a wonderfully contemplative space to wander through or maybe have a cup of tea at the tearoom on the second floor. Now, I'm going to have to come clean: I'm not an architect. I am however a fan of architecture, which may have been helped by the fact that my maternal grandfather was a professional architect before he retired in the late 1990s or early 2000s. He very kindly gifted me a few books from his collection some years ago, including his copies of Sir Banister Fletcher's A History of Architecture on the Comparative Method and Nikolaus Pevsner's An Outline of European Architecture, to name just two. Knowing his interest in Wright's work (he's said at least once that Wright is an excellent example of an architect to study), I ended up video-calling him on holiday in Auckland while there, just to show him where I was, which he deeply appreciated. Alastair
-
KATO C30-7 REMOTOR Third attempt proved successful. The motor mount fits like a glove. Motor is friction fit. Tomorrow will solder leads to the motor. Then the daunting task of removing the flywheels. Have the mini gear remover and have done it before. Hope the pin is still good...
-

Ikonen's Finnish N Scale Project Diary
Keisarikonen replied to Keisarikonen's topic in Layout Building
Did you mean these plastic wood finishes? Truthfully I havent considered it, yet it seems like an interesting choice to use these plastic wood veneers. Is it necessary to lacquer the veneers tho?