All Activity
- Today
-
Another small building project. This time a Green Max kit. Thought it would be an easy break from some of the more complex Sankei kits I have and it was pretty much except for the window inserts. They need to be cut to fit into tight spaces so the first one took several tries though the last few were pretty easy. Also kept the painting simple with minimal weathering. The stove pipe was a poor fit and took a couple of tries to get right - it looks angled in the picture but actually is straight (at least for now)! Ciao, Tony

-
Too much cool stuff 😄 Since I've sort of picked up the N project again, I may need to order some things at some point ...
-
My Plaza Japan order arrived, once it was shipped took less than 2 weeks via registered Japan Post to get to me in Australia. I'll never get used to how small N gauge stuff looks when you first get it! I also ordered some of that fine tape to see what it was like. I'm not sure what I was expecting, but again, absolutely tiny 😝
-
Beautiful Marc! Kudos, jeff
-
Finally, this is what it looks like on the layout
-
First 3D printed building This is my first 3D printed building. I printed it in two parts, the front (facade) and the back. It is inspired by the Megane Ichiba building in Shibuya Location: https://maps.app.goo.gl/puFJona8UX6jutiG9 I took this opportunity to refine the signboards. They are also 3D printed, and I used new 2.7mm Super Slim COB LED Strip Lights to build them. Available here: https://www.aliexpress.com/item/1005003193200776.html I have spent a lot of time designing the staircase, but it was not difficult to print. It looks good after being fitted with LED lights. The facade is a bit intricate. I paid attention to the 3D logo, which has its own (also 3D printed) spotlights. Each fellow has been lighted individually. And finally this is the first-floor shop
-
Rich, we used the identical sheets for the first 5 years of JRM layouts as well! jeff
-
Welcome Rovan! Glad you found the forums and the JRM layout to get you started in Japanese n scale. Luckily it’s probably the best combo of affordability, quality and selection out of all scales, so at least you will get a lot for your savings! cheers, jeff
-
@Rovan welcome! This is a great place for information. As for cost, I have found it to be very reasonable, and less than HO and probably than O.
-
Finally got a chance to run my Tomix Twilight Express. It was definitely a chore to convert all of the Arnold couplers to TN
-
I want my layout to controlled by a computer and if I decide to run a train the others are being controlled by the computer...I have 3 lines and one of them is a trolley system with 6 trolleys(trams) running on them.... I enclosed a PDF of my layout... Chilltown 11 Tracks NL.pdf
-
Not sure if I should be making my own intro thread, but hello all! I just started N scale less than a month ago after purchasing a Kato P42 starter set plus the M1+V1 track combo, though I was heavily inspired to take the plunge after visiting the Japan Rail Modelers booth at the Sakura Matsuri event in DC. As much as I'm tempted to vomit out a few paragraphs of fluff, I'll just say that most of my background stems from MTH O Gauge as a kid with a small stint in HO; still, definitely looking forward to creating something fun with N scale even if I destroy my savings!
-
OK, so my best options are probably Peco SL-302 or Kato 21-001, since I'll be using Tomix's concrete sleeper items as much as possible. Thanks everyone - very helpful!
- Yesterday
-
Christopher, do you mean the longer Tomytec emu trains, or the single or two-car Tomytec items that use the TM-series power chassis? I find little need for interior lighting, since I do not run my models in darkened rooms, and in a lifetime of riding real passenger trains daily I never saw a real coach's lighting come visibly out of the often-tinted windows in daylight conditions. (Only on Lionel toy trains...) If you just want headlights and taillights, that is easy to do yourself, if you can do some basic soldering. You simply string together an LED, a current-limiting resistor and a protective diode (to keep reverse current from damaging the LED) in series. Solder the two leads from this assembly to the power strips in the powered chassis. Orient a white or yellow-white LED and diode in one polarity direction for a directional headlight, and a red LED and diode in the other polarity direction for a directional taillight. You can do this at both ends of the chassis. The cost is very low. Many small LEDs are readily available today, and many come with thin lead wires and current-limiting resistors (sized for 12 volt use) already attached. You can drill out the model's headlight casing, insert a small tube long enough to stick out inside the shell, and then optionally place a short piece of plastic insulation off the right size wire onto the tube. When you assemble the model you stick the LED with its long leads into the insulation or the tube. That way the light does not leak into the interior of the car and the LED lines up with the headlight opening. If you have to disassemble the car, separate the shell from the chassis and then carefully slide the LEDs out of their insulation holders or tubes. You end up with the shell entirely disconnected electrically from the chassis. Rich K.
-
AJ, it would help to tell us more about your layout plan. Is it really a railroad layout with subways, trolleys and trams added as an "action accessory" (which many people assume, as Beaver has done), or is the main focus on the subways, trolleys and trams? Why do you think you want or need DCC? A lot can be done with just a few simple electrical blocks, and the use of the power routing function built into Kato and Tomix track switches/turnouts/points can eliminate much wiring for yards and sidings. So tell us what your plan is, and our answers can be more useful to you. Rich K.
-
I use art paper sheets for my layouts, and plan to never "grow up" to "real" scenery. Look for an art supply store that sells Canson "Mi-Tientes" sheets. They come in a wide variety of colors, in both 19" x 25" (to cover bigger areas - 10 will cover a whole 4' x 8' sheet of plywood with overlaps) and 8 1/2" x 11" sizes (for smaller areas, or you can cut to odd shapes as needed). This heavy art paper comes from France and is meant for use with pastels. This paper is 50% cotton, acid free, fade resistant, and has a slightly heavier texture on one side than the other. Colors I find useful on my layouts are #448 Ivy (grass areas), #336 Sand (light soil, in yards, etc.), #345 Dark Grey (under city blocks - I'm a trolley/tram modeler) and #429 Felt Grey (a lighter grey). Cost in the U.S. is only about $3 to $4 for a 19" x 25" sheet, and I have been using and reusing my sheets, including on train show and club setups, for over 15 years now. Due to the size of the larger sheets, it may be best to find a local store rather than having it shipped. If you overlap the pieces starting from either side to wherever you will operate your layout and from back to front, that will help to minimize the shadows along the overlaps. Rich K.
-
https://www.tomytec.co.jp/tomix/products/n/1529.html Joiner / joint piece
-
A Possible New Project Now that I have a handle on designing fire escapes I have been thinking about another project to work on. I would quite like to have a go at a range of arcade roofs. They are something that feels very Japanese and I think they would add a nice little detail to a street scene. I have been looking around for some nice examples they seen to range in size form moderate to monstrous. I am certainly happy to have a go at a few moderate designs to start off with. I have not done much work on this so far as I am not totally sure it something that would be popular. I know that Tomytec offered an arcade section so I would want to make sure that I am offering something a little different. My feeling at the moment is to just offer the roof as an etch along with templates for cutting all the cladding to the fit correctly. It would be very much a kit that needs additional work I am not even planning on including legs, at the moment, as the heights appear to vary greatly but include tabs at the bottom of the roof to slot legs into. I found some lovely pictures of an arcade in Sakaide of a section that had all the cladding removed so you could see the internal structure. I was able to use this to draw up a rough idea I what I am thinking: One thing I have noticed is that most examples have at least a catwalk to service the roof and many also carry utilities above the street. This was case for the example above. It also had raised sections for crossing roads which look rather cool. It seems like something that could be expanded upon with a basic pack that has a straight section then other packs that offer raised sections, wind breakers for open sections, junctions or bends. This is the section I drew up using the above design: I included the raised section, catwalks and masts for utilities. I just find these structures interestingly ugly (in a good way). I would like to hear your thoughts if you think it something that you would interested in. Joe
-
@cteno4 This was just a transfer applied onto the road. I haven't tried placing one over an etched cover yet. I was rushing and could have done a better job of cutting and trimming the cover however it wouldn't hurt to make the black boarder a little thicker. It might work better on clear transfer paper, then you could get away with not cutting the circle perfectly. You probably could sand or file the edge carefully while it still on the backing paper. I will have another go at the weekend and try to cut more carefully. I will also try to apply one over an etched cover. The next time I have something to print on clear transfer paper I will add a few covers to test them. @Madsing The 1:80 covers came out great, I will have to make them available. I have not had much success with sales in this scale that said I have only really scaled up the pipe barriers, I should probably offer some more items. Thank you so much for taking the time to post pictures of buildings to show the dimensions. You have no idea how helpful that is. I am happy to offer the steps in different heights. It really won't take long to alter them. Below are the adjusted steps top 20mm, bottom 22mm: The steps are spaced slightly differently, and the 22mm gains an extra step. Also for reference here is the 22mm height comparing a 35 degree (left) angle and a 46 degree (right): At some point I would like to offer add on packs with alternative landings and steps to allow more variety between buildings.
-
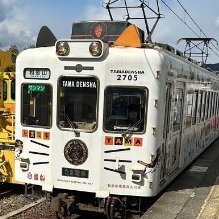
Random photos of stations I have visited
mojo replied to mojo's topic in Japan Rail: Pictures & Videos
Takao Station, just passing through. It was a dull day but I did my best.
-
What about Kato’s flexible track? I particularly like the new Prestressed Concrete Sleeper Flexible Track. I have purchased some, but not used them yet. https://www.1999.co.jp/eng/10933230 https://www.1999.co.jp/eng/10778701
-
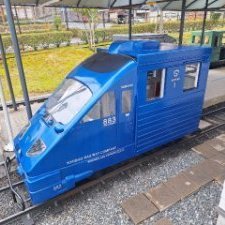
Random photos of stations I have visited
mojo replied to mojo's topic in Japan Rail: Pictures & Videos
Next trip booked. Yachiyomidorigaoka Station (try saying that three times fast). Maybe the crop could be better. By pure fluke the colour composition is nice, with the orange lines and little bit of green on the right. Straight out of the Pixel 8 Pro. Which reminds me. Google... I'm gonna need you to not upgrade the cameras this year, okay? I have to stick with this phone a bit longer and my trip is too close to the release date to see serious discounts on the new one. Seriously, do AI or something.
-
Unless you can do hardwired decoder installations yourself or pay someone else to do it (which may involve milling out room for decoders, or putting them inside the car interior where they are easily seen through the windows, or using very tiny decoders.), your only options are the Kato 'DCC Friendly' range which allows you to unclip the main circuit board and swap in one with a built-in decoder. None of the trams have this facility and many of the multiple unit trains don't either. Consider whether you actually need DCC for tramways and subways. If they are running on their own separate, simple tracks to the main lines of the layout then those tracks could be analogue. A tramway that just loops around a few blocks for example doesn't need a complex control system. Just set the trams to circulate as a moving backdrop and focus on running the main line trains with DCC.
-
Green Max motorised chassis are much more compact than Tomytec with the top below window level so the interior appears open. They run better too. Given how standardised the real thing is both ranges unsurpisingly offer many of the same lengths and bogie specifications. It might be possible to fit one instead of the intended Tomytec to make space for interior detail and lighting in the motor car. Not sure how much modification to the body would be needed - the attachment points are different but not that different.
-
I would recommend Atlas or Peco Code 80. These use the same tall, chunky, massive and robust rail profile as Japanese set tracks and so will join up easily with ordinary fishplates. Most other flexi track has much finer Code 55 or Code 60 rails for a more scale appearance meaning it will be very hard to join the rail ends without differences in rail height, railhead width etc that would be likely to derail or obstruct trains trying to pass over the resulting dodgy joint. Since Tomix track dosen't have special fancy joiners like Kato there's no need for an adaptor track, just cut off the protruding plastic from the end of a piece of Fine Track and connect it to the flexitrack with ordinary fishplates. (Actually, with Unitrack you can also just take the unijoiners off any piece and connect to the flex track with fishplates. But the adapter piece makes alignment noob easy.) By far the most difficult part is shimming up the flexitrack to the right height to compensate for the absence of a moulded base underneath. A good starting point would be to measure the thickness of the Fine Track's base as accurately as you can (with a vernier if possible) then look for a roadbed material to go under the flexitrack that is the same thickness. This shows Unitrack connected to flexi, not Fine Track, but the principles are the same. Remove joiners from one end, match height to flexi by building up under the track, and butt together with fishplates.