All Activity
- Today
-
Working on 3D print of top loop... This is a 110mm tall viaduct for 216 radius Kato Unitrack Up track in on right outside.. down track out on right inside, so no point used, no reversing wiring required.
-
OK Quick and dirty track plan. The idea is that the Chuo line runs from Shinjuku (Tokyo) to Muratomo and beyond. The hidden sidings form the start and finish points for a train. The action is at Kobuchizawa a junction station for the Khumo overland line. (which is not a terminal line as I have set it) I can run Limited Express, Rapid and a Kobuchizawa terminating local for passenger service. The branchline is a single car as is typical on the actual Khumo line. Interspersed with busy passenger will be block JRF trains of containers, tank and refrigerated fish loads from west coast sources like Kanazawa. I will also operate a late night parcels express and a local freight to shunt the yard and leave traffic for the Khumo branch. Of course there will be an occasional tourist steam special to the branchline in the middle of everything else just for a bit of spice. I am really cheating with so much JRF traffic but the idea is to have plenty of variety and a busy timetable trying to fit JRF around passenger services. With such a small layout I need the traffic intensity to sustain the operational interest.
-
6 months, that’s a good period to see something. Sounds like it’s holding the stress well. yes clear wood, especially on small dimensional lumber is so important. But these days you have to pay thru the nose to get it! I’ve moved over to using 12, 15, and 18mm Baltic birch ply and cutting strips of it to make dimensional lumber. It’s cheaper (even with the rise of Baltic birch prices) than clear dimensional lumber and it holds up better to warping. I’ve been amazed by its strength. anyhow wonderful to be able to work on wiring like that! How much time I’ve spent upside sown on layouts! cheers, jeff
-
Totally agree Jeff. I was loathe to do it but with the interest in experimentation I kept going. The other side has the full depth of the cross piece. I had in mind backing up the gas strut connection with an short length of pine if I saw any problems. So far it has survived 6 months of open and close without a hitch. I cannot see any incipient failure, like a crack starting. But just to repeat, the cross pieces and diagonal bracing were all glued and screwed to make the structure as robust and integral as possible. The sandwich of a metal plate on the back face is the back up plan as you suggest. Hence the bolts left long enough to carry a metal over-plate. I am quite happy to fool around structurally as whatever I learn is then available to others to use. The interesting thing is that the timber has been so tolerant and robust. One important thing was to select the pine parts to be completely knot free so that full strength was in all parts. The tilt function is sweet though for wiring work! (see below)
-
I missed the Nanaimo show 🙁. It is rare to find Japanese N scale in the wild here. I got a few good Japanese kits at the Victoria show a few years ago when one of the stores was liquidating.
-
Im looking for a Japan Rail Freight decal for my EH200 got any suggestions?
bc6 posted a topic in General
like the one on the first locomotive in this video. - Yesterday
-
Greatest tool ever made—or—‘Spudge’ is not a dirty word.
cteno4 replied to CaptOblivious's topic in The Tool Shed
Another handy spudger, this style is nice for popping bodies off chassis. Having a pair helps to work down each side at the same time. Avoids having to really bend the shell out a lot to get all the clips disengaged. Some have like 3 clips on both sides and as you get one popped out another pops back in, so starting at one end with these getting them popped out and shell pushed up a tad you can then work down the shell to the other end. jeff -
Looks good. I guess my only concern is it’s bolted to a thin spot on the cross piece there with that slot cut out in it. I guess if any distress you could add a metal bar on the far side of the cross piece that extend out a ways on either side of the strut bracket to distribute the load some and beef up the cross piece. Hard to tell what will happen with time. jeff
-

3 Pole Motor replacement for Tomix Shinkansen series 300,
Andy110869 replied to Andy110869's topic in The Train Doctor
Im afraid i cant, as there are arrows on which orientation the chassis and casing are supposed to go, and yes that would be a nice luxury to switch the motor 180 degrees, but the casing is not symmetrical and has one direction it should be fitted. But thanks for the input.😀 Also what is not shown is there is a wedge peice of plastic, that has a small capacitor that is up against the two motor connectors, there is a special indent in the metal casing. I have thought about crossing insulated wires very carefully from the motor to switch polarity, so that each connector, wire hits the brass strip conductors underneath. -
3 Pole Motor replacement for Tomix Shinkansen series 300,
Kamome replied to Andy110869's topic in The Train Doctor
Surely just rotate the motor housing 180 degrees in the frame so that those round terminal tabs are on the opposite chassis side to what they are now. -

3 Pole Motor replacement for Tomix Shinkansen series 300,
Andy110869 replied to Andy110869's topic in The Train Doctor
And heres the link to it working , on a bloody carpet!!!. I know i know, but i did this quickly without putting the board down and i dont ever usually do that. Theres nothing worse than a harvest full of pubes in a revered loco, I always hoover the track before every use tho Now just the one problem, my directional headlights have reversed going forwards is now the red headlight and the back is white, Is that a negative polarity motor, or have i screwed up the assembly?, Not too bad if i have to take the loco apart (done it over 20 times) I can live with it if i really really had to, but would rather it worked. Im not using it in a layout so authentic realism isn't a must for this one, im just pleased it rolls. -

3 Pole Motor replacement for Tomix Shinkansen series 300,
Andy110869 replied to Andy110869's topic in The Train Doctor
-

3 Pole Motor replacement for Tomix Shinkansen series 300,
Andy110869 replied to Andy110869's topic in The Train Doctor
Heres the photos to show the old and new motor, how it fits , like the original into the metal chassis, and i must add even though the shorter shaft didn't have much purchase of the black hex end thingy, it was enough without the glue in testing, however in time it might have come loose so i used evo stick 'serious glue', which is very strong and very flexible, its working, but for one thing.... -
To allow for clarity and focus, the discussion on Pocket Sized Modules, which are fully compatible with Kato Mini Diorama modules, has been moved to its own thread - thank-you to cteno4. See:
-
What did you order or the post deliver? (Japanese N Gauge)
SL58654号 replied to bc6's topic in General
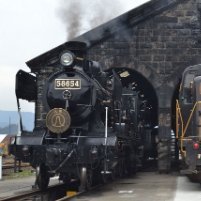
Well, new jobs and new ventures are starting, and thus I thought that I could treat myself again. After strolling once more into Nikkyosha Model Shop I walked away a happy new owner of these beautiful blue passenger cars (12 series) to go with my C56 160. I'm more in favor of older clerestory-roof style coaches, especially the wooden ones that operated in Japan, but these are so iconically affiliated with JR West preserved steam excursions and others across Japan that I went for it. They'll also be suitable to run behind D51 200 and C57 1, both also a part of my SL collection. Next I'm looking forward to the re-release of the Hokkaido Giesl-ejector type D51, and the 009 Welsh Pony, which is coming sooner. The Kato sound box would also do. I was allowed to keep the small dealer display card, too! Now I Really ought to get back to finishing the layout... -
This is what the gas strut installation looks like. So far the timber has not complained and the brackets are hefty but that is the standard part that is supplied.
-
Love the look of the BART, the trains and some of the stations. Had a ride when I visited USA in early 2008.
-
A nice, short news blurb "BART legacy fleet phased out to make way for ‘Fleet of the Future’ " I really want the Rapido HO BART, but I have zero excuse to actually own it. Rapido claims it will ship toward the end of the year.
-
Hi tripel7, I ride Kato 66-100 with the new engine, she rides quiet, slow and fast very well !!! I also have a Tomix 66-27 7159, it is also quiet, slow and fast. I am very happy with both machines!
-
What I am finding is that compared to what I have seen in Japan, we are pretty boring here.
-
Prototype for everything (scenic edition)
brill27mcb replied to railsquid's topic in Scenery Techniques & Inspirational Layouts
"Oh, yes, the Lawson's that has a Mount Fuji . . . " 😀 Rich K. -
Great, but none of which in the context of the EF66 models
- Last week
-
https://jnsforum.com/community/search/?q="Kato vs tomix"&updated_after=any&sortby=relevancy&search_and_or=or Lots of Kato vs Tomix chatter been had.
-
I've been thinking of adding an EF66 to the fleet, what are the main differences between the Kato and Tomix models? I find this offering from Tomix interesting, anyone else has experience with it? https://www.plazajapan.com/4543736983880/
-
Oh man Chad, I get tired just looking at all the work done! Almost there and into the home stretch hopefully here! Looking wonderful. jeff


