All Activity
- Past hour
-

3 Pole Motor replacement for Tomix Shinkansen series 300,
Andy110869 replied to Andy110869's topic in The Train Doctor
Im afraid i cant, as there are arrows on which orientation the chassis and casing are supposed to go, and yes that would be a nice luxury to switch the motor 180 degrees, but the casing is not symmetrical and has one direction it should be fitted. But thanks for the input.😀 Also what is not shown is there is a wedge peice of plastic, that has a small capacitor that is up against the two motor connectors, there is a special indent in the metal casing. I have thought about crossing insulated wires very carefully from the motor to switch polarity, so that each connector, wire hits the brass strip conductors underneath. - Today
-
3 Pole Motor replacement for Tomix Shinkansen series 300,
Kamome replied to Andy110869's topic in The Train Doctor
Surely just rotate the motor housing 180 degrees in the frame so that those round terminal tabs are on the opposite chassis side to what they are now. -
3 Pole Motor replacement for Tomix Shinkansen series 300,
Andy110869 replied to Andy110869's topic in The Train Doctor
And heres the link to it working , on a bloody carpet!!!. I know i know, but i did this quickly without putting the board down and i dont ever usually do that. Theres nothing worse than a harvest full of pubes in a revered loco, I always hoover the track before every use tho Now just the one problem, my directional headlights have reversed going forwards is now the red headlight and the back is white, Is that a negative polarity motor, or have i screwed up the assembly?, Not too bad if i have to take the loco apart (done it over 20 times) I can live with it if i really really had to, but would rather it worked. Im not using it in a layout so authentic realism isn't a must for this one, im just pleased it rolls. -
3 Pole Motor replacement for Tomix Shinkansen series 300,
Andy110869 replied to Andy110869's topic in The Train Doctor

-
3 Pole Motor replacement for Tomix Shinkansen series 300,
Andy110869 replied to Andy110869's topic in The Train Doctor
Heres the photos to show the old and new motor, how it fits , like the original into the metal chassis, and i must add even though the shorter shaft didn't have much purchase of the black hex end thingy, it was enough without the glue in testing, however in time it might have come loose so i used evo stick 'serious glue', which is very strong and very flexible, its working, but for one thing....
-
To allow for clarity and focus, the discussion on Pocket Sized Modules, which are fully compatible with Kato Mini Diorama modules, has been moved to its own thread - thank-you to cteno4. See:
-

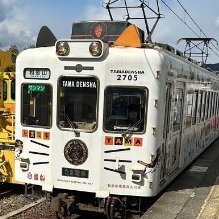
What did you order or the post deliver? (Japanese N Gauge)
SL58654号 replied to bc6's topic in General
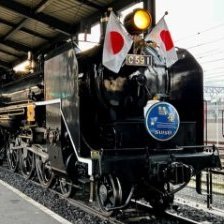
Well, new jobs and new ventures are starting, and thus I thought that I could treat myself again. After strolling once more into Nikkyosha Model Shop I walked away a happy new owner of these beautiful blue passenger cars (12 series) to go with my C56 160. I'm more in favor of older clerestory-roof style coaches, especially the wooden ones that operated in Japan, but these are so iconically affiliated with JR West preserved steam excursions and others across Japan that I went for it. They'll also be suitable to run behind D51 200 and C57 1, both also a part of my SL collection. Next I'm looking forward to the re-release of the Hokkaido Giesl-ejector type D51, and the 009 Welsh Pony, which is coming sooner. The Kato sound box would also do. I was allowed to keep the small dealer display card, too! Now I Really ought to get back to finishing the layout...
-
This is what the gas strut installation looks like. So far the timber has not complained and the brackets are hefty but that is the standard part that is supplied.
-
Love the look of the BART, the trains and some of the stations. Had a ride when I visited USA in early 2008.
-
A nice, short news blurb "BART legacy fleet phased out to make way for ‘Fleet of the Future’ " I really want the Rapido HO BART, but I have zero excuse to actually own it. Rapido claims it will ship toward the end of the year.
-
Hi tripel7, I ride Kato 66-100 with the new engine, she rides quiet, slow and fast very well !!! I also have a Tomix 66-27 7159, it is also quiet, slow and fast. I am very happy with both machines!
-
What I am finding is that compared to what I have seen in Japan, we are pretty boring here.
-
Prototype for everything (scenic edition)
brill27mcb replied to railsquid's topic in Scenery Techniques & Inspirational Layouts
"Oh, yes, the Lawson's that has a Mount Fuji . . . " 😀 Rich K. -
Great, but none of which in the context of the EF66 models
- Yesterday
-
https://jnsforum.com/community/search/?q="Kato vs tomix"&updated_after=any&sortby=relevancy&search_and_or=or Lots of Kato vs Tomix chatter been had.
-
I've been thinking of adding an EF66 to the fleet, what are the main differences between the Kato and Tomix models? I find this offering from Tomix interesting, anyone else has experience with it? https://www.plazajapan.com/4543736983880/
-
Oh man Chad, I get tired just looking at all the work done! Almost there and into the home stretch hopefully here! Looking wonderful. jeff
-
Haven't done an update in a while. We are actually way past where these pics are for the most part. The only recent ones are the tile ones at the end. Most of the painting is done and has been done. STill some cut-in at the ceiling, a few really high up last few feet in some halls and a bathroom, and some closets still need to be done. Most all the lights and outlets and switches are in. Jiust a few random ones here and there not. Garage doors were installed -- not sure when and if it was before the last update. Kitchen cabinet boxes were installed between eb and yesterday. The countertops were installed in February. The wall cabinets in the last couple weeks with the final stuff yesterday. Two showers were tiled (but not yet grouted) and the Ofuro (Japanese bath) room floor was tiled and grouted (no pic after grouting though) but the wall not tiled yet. Solar panels were installed in February but just came online a few weeks ago (bureaucratic snafus) and are generating. They're only half of what was planned at the moment due to cost increases in everything else. But it is still 18 panels. I'm tiling the kitchen backsplash today and tomorrow and we'll start putting LVP down asap as well. Most of these pics are older and I need to go around and take a bunch more.
-

What did you order or the post deliver? (Japanese N Gauge)
chadbag replied to bc6's topic in General
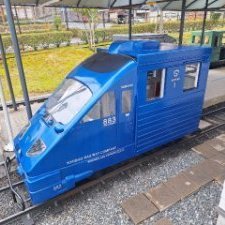
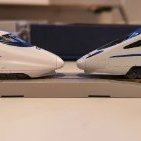
That's kind of cool. Kind of like "desk toy" style for train nerds. (I'm a big fan of "desk toys". They're a little big to have a ot on your desk but a couple for decoration would be cool. I'll have to look for them next time I'm in Japan. (Supposed to be this summer but with our building project its postponed) Or something to put on a shelf in the train room for decoration. Maybe I could sneak some onto a table in the living room or something (when we have a living room) -

Prototype for everything (scenic edition)
bill937ca replied to railsquid's topic in Scenery Techniques & Inspirational Layouts
A Lawson in the view of Mt. Fuji. https://www.theguardian.com/world/2024/apr/26/fujikawaguchiko-town-japan-block-mount-fuji-view-overcrowding -
Great work so far! I'm very excited to see the track plan and the layout develop 🙂
-
Forgot to attached images.
-
I'd kind of say they are a sort of O scale, B train shorty. Here’s some behind my HO stuff at Stage One. Sadly the Koki are just a moulded plastic with no articulation whatsoever. They come with a separately fitted handrail that actually is stowed on a underside moulding when purchased. The containers are all steel tin plate with a push lid, like a biscuit tin. They do have a wealth of options in terms of livery across JR Freight and mainstream couriers and hauliers as well as some JNR and larger international shipping companies. They also stack on top of each other very neatly. A recess in the lid matches the footprint on the base. They even sell truck trailers to load them on too. Range availability seems to differ across the ¥100 stores. Some Daiso have little to nothing while others have many container options. Likewise, some Seria stores carry them while others don't. The ones I have are just combination of when I've come across them or new container options in various stores.
-
3 Pole Motor replacement for Tomix Shinkansen series 300,
Andy110869 replied to Andy110869's topic in The Train Doctor
Well that didnt work! The aforementioned and screenshot might have been a good idea but for two things. The connecting tubes were too tiny to sit sturdy in the connecting pipes, and the cardan shaft receiving end in the black drive unit connected to the motor would not fit as the shaft was not long enough to hold the inner connecting shaft. However what did work was , simply taking the black motor end thingies, we will call it, off the original broken motor and placing on the new ones, even though the shafts were a bit too small, a quick test revealed there was enough play allowed for it to work, so to help I glued the black motor end thingies giving a tiny bit more length, set back slightly, but not enough to notget a proper purchase, and Voila, Its working nice and smooth and at high speed. I will post pictures later which will explain most of my lack of technical understanding for the relevant parts. IT saved me having to wait and search and buy a used engine from an old train that at the lowest i found for £30 and thats with no guarantees, and selling as faulty with an engine thats losing power. I have in essence , just had to pay £6. So okay, this time for my troubles and convaluted way of going about it, I actually spent, £15 for the stainless steel piping and other experimental motors, but now i will buy a few of the compatible short shafted, type, until such time Tomix might release the original. i think it will hold up as long as i dont make it run high scale speeds of 350mph haha. My concern then would be the cardan shafts, they would not be easy to replace. Will post pics later. And a working video when i put the thing fully together -
Yeah, simple sticks are simple but since the post was written a while ago I have used the gas struts and they are like magic being able to just tilt and work underneath or on top. The hard part is to get the correct force with the struts. Initially they were perfect but adding the control panel at the front has put just a little more weight on a long lever arm so they are balanced but more weight will put them on the edge of equilibrium. Even that is not so bad as the ball ends of the gas struts unclip with screwdriver encouragement so I could go up in force level a little if I really do need it. I will post a bit more info when I have some working pix to show how it is going. So far the pine frame is easily coping with the forces involved.