All Activity
- Past hour
-
For those interested in Rhaetian Railway trains offered by Kato and wanting to know more about their freight cars, the Rhaetian Railway has diagrams of its freight cars in PDF form. https://www.rhb.ch/de/buendner-gueterbahn/dokumente Scroll down and click on Güterwagen (Freight Wagons). You will find several categories. The Rhaetian Railway also offers advertising on freight rolling stock. https://www.rhb.ch/de/buendner-gueterbahn/angebote/werbung-auf-gueterwagen
-
Joshin Super Kids is always a treat to visit. You almost don't want to leave so you can see all that they have to offer.
-

What did you order or the post deliver? (Japanese N Gauge)
Little-Kinder replied to bc6's topic in General
Went to joshin super kids in Osaka today. It was fun to discover z scale. Some are very toy like and some are very realistic I bought one more tramway from tomytech and the engine And also one sagawa truck with some extra stuff
- Today
-

Bill's Excellent Swiss Adventure
bill937ca replied to bill937ca's topic in Travel: Tips, Planning & Memories
More about SBB. Switzerland has four official languages: German, French, Italian and Romansh. Swiss Federal Railways rolling stock is labeled with initials of its three official names: SBB CFF FFS. The official English abbreviation is SBB. The system is 100% electrified and the only such national system in the world. Only the Japanese travel more by train. From the Federal Office of Transport Fact Sheet: Modal split in freight transport The railways play a particularly important role in transporting freight across the Alps. In 2022, around 73% of all goods crossed the Swiss Alps by rail, and 27% by road. Rail accounts for 38% of all freight transport in Switzerland. Direct transport and clock-face timetable Switzerland‘s ‚national direct transport‘ system, in which just one ticket is needed for a journey no matter how many transport companies are involved, is unique in Europe. The system allows the use of travelcards such as the GA or Half-Fare Travelcard, which cover practically the entire Swiss public transport network. Another important element is the ‚clock-face‘ timetable, involving public transport connections at regular intervals (e.g. every 30 minutes) and good connections at transport hubs. More info on Swiss passenger trains: Swiss domestic journeys don't need to be pre-booked, trains cannot 'sell out', regular full-price tickets are available in unlimited numbers, good for any train that day. For any Swiss domestic journey you can just turn up, buy a ticket at the station and hop on the next train. Seat reservation is not even possible on most Swiss trains, you just turn up, buy a ticket, hop on and find any empty seat. However, it's possible to reserve a seat on some longer distance trains for a small fee if you really want to. The only exceptions where seat reservation is compulsory are a handful of panoramic tourist-orientated trains such as the Bernina Express, Glacier Express or Golden Pass Panoramic trains. But regular trains on the same routes, or even in some cases regular cars attached to the same train, don't need reservation, just an open ticket. -
To add, my recent order of last week from Plaza to the US arrived fine with no delays or any other fees. The order was about $200. I was testing de minimis for stuff coming from Japan. At least that's what I told my wife. 🤣 The funny thing is that I got two Tomix containers. One Made in Japan and the other Made in China. To what Jeff said about China goods through Japan... 🙄🤪 The rest of my order is Made in Japan.
-
Martijn, I haven't really noticed much of a slow down on my end (US east coast). But, don't worry about us and take care of your family first. This is only a hobby despite some of us who are ultra passionate about it. You only have one family. My best wishes for a positive outcome.
-

Kato D51 (1-203) - Issues and Reviews
kusojiji replied to Kamome's topic in Japanese: Other Gauges & Scales
Yep, the ultimate in lease degoichis i guess. Just hang the new number. man, I wish Kato had done a better job at this one. I really had high hopes and this release really let me down. I will wait for reviews next time vice jumping on an announcement. Kato has let me down badly in this case. I had been touting them on other forums as being the standard but am no longer going to be doing that. I am currently returning a UK model. this will be the 4th return in a month. Depite all the good reviews, I have had nothing but junk arriving at my doorstep. Really discouraged at this point. I will stop COPD buying, I hope. I have a ton of HO and N scale stuff that are over drinking age and can use some updating. -

Ikonen's Finnish N Scale Project Diary
Keisarikonen replied to Keisarikonen's topic in Layout Building
Kirsikkapuu Kääntöpöytä (Shelf Layout, Modular Extension) Status: (Needs Tweaking, Possible Rehash) Type: Challenge, Hybrid Modular x Self Track: KATO Unitrack, Minitrix N, Fleischmann Piccolo. Base: XP Foam. Operation: DC Features: Cherry Blossom Trees, Turntable, Challenge. SCARM: Description: Like many, I love watching YT content to get inspired for modelling and model railways. One of the ones I like to watch is Budget Model Railways—kinda like their vibe. Anyway, they had a shelf layout 60x23.5 cm and posted a challenge for it. With my inclusion in the city's makerspace, which gave me access to multiple used wood and foam materials, I went on a date with the sanding machine to create a makeshift shelf with the proper dimensions. Here are my limitations. Rules: To produce a layout of any scale/gauge on a 60cm x 23.5 cm floating shelf. Thickness of the shelf does not matter but must not exceed the 60cm x 23.5cm dimensions. It must have at least one point/ switch and have as much operating potential as possible, ie not a single track diorama. Any type of track inc pre ballasted is acceptable. Ovals are acceptable if they can be fitted in, as long as there is at least one point/switch. It must have two buildings/structures as a minimum, but this can include sheds, signal boxes etc. Backscene can be any height. The fiddle yard must not exceed 60cm in length or be more than two road, it must be separate from the scenic section, i.e. no 4ft boards with only the 60 x 23 section as a layout. The layout should include as much second hand and recycled material and features as possible. The objective of the challenge is to inspire people to have a go at making a micro shunting layout, especially those who have not built a layout or micro layout before, and to do so on a limited budget. Whilst I will be interested to see any layouts outside of the criteria, only those that meet the criteria will be featured on the website. There is no prize or reward, or ranking 1st 2nd 3rd etc, its just a fun challenge to inspire people to enjoy making a micro layout The first challenge is figuring out what to do. The rules are that it must have a turnout for operation and not just a straight line, as well as at least two structures. It can feature a separate fiddle yard. It is also possible for it to be an oval. It was emphasized that the materials used for the diorama should be as recyclable/used as possible, fitting the budget aspect of it. I had a Fleischmann Piccolo manual turntable and decided to measure it in. To my surprise, it fits snugly in the 23.5 cm width. I then connected the tracks and exchanged the extensions of the turntable. I found that both Tomix and Kato tracks are perfect for the turntable as they have a similar height to the structure, so I fitted them in. Yet the Minitrix track with the turnout was, of course, too short, so I had to support it with card and cover the blemishes with ballast and grass later on. The tracks on the right could be a fiddle yard using Tomix track, or connect with the 4-season modular layout on the left. The structure was coming along well, and choosing buildings was easy. The turntable itself is a large feature, and I had an unused building that worked perfectly as a “worker's apartment complex.” Did the usual grassing, but this time I also made my own static grass using brown thread soaked in paint, and painstakingly cut bit by bit. It worked pretty well and Im pretty sure itll be excellent when used with a static grass applicator. Yet despite so, it still looked bare even with the shrubbery. I remark how opportune coincidences happen at the most opportune moments, but in the Discord, @Martijn Meerts and I were coincidentally suggested cherry blossom layouts and designs by the YT algorithm. These are the following videos. I remarked that I would kill for a 24-366 KATO x Woodland Scenics cherry blossom set. But, defeated from seeing how morbidly expensive trees are, I decided to make my own, and I thought of using a full cherry blossom garden as inspiration—particularly Roihuvuoren Kirsikkapuisto in Helsinki, an entire park of cherry blossom trees created as an act between the Finnish and Japanese governments. So I began constructing my trees. I featured them a little in Discord and one of the forum threads. My process initially was 3D printing tree armatures that best fit cherry blossoms. When I saw the free ones barely looked like cherry blossoms, I decided to buy some florist wire and create the trees myself. It was a long and tedious process that I mostly had to use tools for, but once I began to understand the rough idea of making trees using wire, I found the process rather relaxing. I built different types of armatures, thin and large. The first large armature was painted dark brown, as cherry blossoms are commonly found to have dark bark. It was my first tree and test tree. One of the issues I had when I placed the pink foam on the tree was trying to trim the trees from being too puffy. Most of the techniques I saw were a mere splash and shake of the pink bits, but since my foam was more joined together, I had to place it properly. My partner helped me with trimming the foam while the glue was wet. It is also at this point that I am considering getting an aerosol-based glue spray for the trees to make sure it sticks, but it is still rather expensive. The tree armatures were initially made using a mix of paint and wall hole putty, before trying with glue and paint only. The former was very difficult to use, as wall putty was rather hard and dry in the hands. Glue and paint only was too wet and still left some exposed wires after drying. I decided to try a mix of all three and used a lighter colour for the bark to mimic other varieties of cherry blossom. Also, Lukes Models—now known as Boulder Creek Railroad—used to make a good video on wire trees with added static grass for tinier branches, and I did just that. The resulting tree was very good. The triple mixture made a very hard and barky feel to the tree, as well as being really easy to work with compared to silicone. It’s also good enough to reshape your trees after the mixture has dried. A little bit of white powder on the trees and on the ground to mimic the fallen cherry blossom petals makes it excellent. I also had some tiny parts of the homemade pink foam that I pasted on the ground. While it provides a little contrast, it’s rather peculiar to have piles of cherry blossom leaves like that, decided to stick with it for the color it gives. But maybe for the next one I can just paint white powder with the pink Vallejo paint (maybe baking powder?). For the final touch, I used a mix of glue, light brown, and static grass to create the walk path. The asphalt uses black ballast instead of the Vallejo Diorama FX (since I can’t find it—must be in storage). The station module was still rather bare, but I 3D-printed a little shed. I might print something else or repurpose it as a depot. Also used the gazebo from the three bridges layout so it provides more flavour to the scene. However, the layout did have a major failure point—the turntable. It wasn’t working initially, and people suggested to me that it was due to oxidation. The turntable had a date with the track rubber, and trains can work now. However, there were still some issues. The turntable doesn’t fit properly into the extensions where the train should get off it, so locos with lower chassis either get stuck in the middle or derail. Instead of manually turning it and having a simple turntable, I literally have to carefully align the tracks so a limited number of trains can pass through. It honestly became a complete chore. I can perhaps try to file the tracks or really align them with the turntable. But at some point, I’m kinda done with it, to be honest. I’ll be bringing this module to the exhibition tomorrow and submitting the pictures to the YT channel for the challenge. But I am planning to rip apart the turntable and trackwork, and install a double track with a Kato double cross 310 mm. Also didnt like the minitrix track, it really does look out of place. Overall this is what it looks like, by far this is my prettiest layout with the best pictures. Absolutely love the flavor it adds. I just wish the turntable was more operational. I love making my own trees and will start doing so, and the static grass I made were incredibly economical compared to buying ones from Noch or Woodlands. Maybe getting an applicator is good. I am tempted to make side modules with backscene to make excellent pictures. Running Video: Attachments:
-

Kato D51 (1-203) - Issues and Reviews
wazzd replied to Kamome's topic in Japanese: Other Gauges & Scales
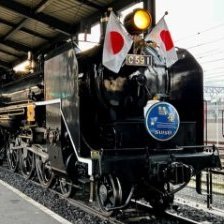
Here's a photo from Smugmug D51 at Haiki 1963...interesting number plate fitting to cabside. Note also the deflector style. The associated story suggests that no D51s were allocated to Haiki and would have come from Tosu on regular freight working for Sasebo line. -
Slow Forum?
Martijn Meerts replied to RS18U's topic in The Agora: General Administrative Discussions
Hi all! As you are no doubt aware, to forum has slowed down again. After doing a little research, I think we may have finally found a reason for this. It won't be a quick fix, and I'm not sure when we'll be able to work on it, but at least we know where to look now. The first step will still be updating the server software and the forum software. That in itself might alleviate some of the issues. Due to a severe family health scare, I can't really say when I can sit down and get that done however. -
Kato D51 (1-203) - Issues and Reviews
wazzd replied to Kamome's topic in Japanese: Other Gauges & Scales
I looked at the maps I have from 99.....pre google....and I don't know how I found it, I think it was marked on a guide map, so far I haven't been able to find it. 😆 I walked there from the station it wasn't far but you're right although it was called a "museum" it wasn't much more that the Loco and a very small park. I did get some pics of the Matsuura line at the same time. -
I keep eyeing these Iida line beauties up too. I rarely seem to run my Iida stock these days but I still love the subtle variety of these old electrics. The Kumoha 52 is such an iconic looking train.
-
Welcome Chris, glad you found us! Ugh oh sounds like you have caught the bug. Sorry no cure you [and your wallet] are sunk… cheers jeff
-
Yep you got it. Lets you switch any block to either cab a, cab b, or off! About as versatile as you can get short of going to dcc basically its what you/I drew up just repeated the same for each block on the whole layout! Each block has both wires wired to the dpdt for power and is insulated on both rails on anll ends of the block. Just keep repeating all over the layout. Biggest thing to figure out is where to put your blocks and where to put feeders in your block. Blocks are usually to isolate sidings and break up a large mainline into sections to help with operations. You could be running a train on the mainline but need to bring a train out of yard onto the mainline for a bit while you transfer it to another track. You could keep the train running on the mainline while you use the other cab to bring the train out and back into the yard on the mainline briefly. for the power feeds you want those spread out well and strategically placed on either side of points or double crossovers as needed. cheers jeff
-
Jeff Thank you again for your help Jeff, and yes you have made all this a lot clearer, it is starting to make sense, i will drawer it all out and let you have another look. i am glad i asked you for your help i could have been searching for a long time and i can also see that the placement for the power controls cabs comes into play as well, i will have a good look before going to far. cheers Jeff Tony
-
Hi @CWOOD welcome to the forum!
-
AH ok so when i have my whole layout wired for blocks and lets say i have all my DPDT switched on i could run a train a complete circuit around my layout ?? because all the blocks would have separate power from there respective DPDT switch ?? I think this is making sense and yes i was still thinking a cab power control for the inside track and another cab for the outer, this way i control both inner and outer with both cabs combined via block sections I think my problem is i wanted to know how it works before understanding the concept Tony
-
You may be confused by the partial block wiring using a common rail between two throttles. Its can have some issues and just a lot easier and safer to isolate each block on both rails on both ends and supply power to both rails in a block from the DPDT switch for the block. jeff
-
Each block of track you insulate both rails at both ends so the block is totally isolated from connecting blocks. Then you feed power to the block with your power feed [or multiple leads if the block is a long stretch of track] within the block that is then wired to the center terminals of the dpdt. Power is supplied to each block then by its dpdt switch that gives the block power from either throttle A or B or off. jeff
-
Jeff Its just jumped out at me i have insulated the rails so how do i get power ac cross them ??
-
Tony, ahh i think you are retaining the idea of inside and outside tracks both being controlled by separate throttles [sorry I used the shorthand of Cab for throttle] like you would with just using the point routing. with block control each block of track over the whole layout can be switched between your two throttles. This way you could set the DPDTs to be on throttle A from the yard on the outside loop, onto the mainline and then over to the inner loop. Then once there switch all the mainline track loop to Throttle B to run the train there while you use Throttle A back moving trains around on the outside loop. You no longer need to have a throttle dedicated to each of your loops when you use block wiring. It’s much more versatile this way and you can also turn blocks off easily if a train is on them and you need to move something else around on the same loop. So wire ever block of track on the layout to a dpdt switch and then your two throttles to each dpdt switch. You do the same thing everywhere. sorry i may have confused you earlier when i said inside and outside tracks when I meant to say inside and outside rails to keep your polarity straight on each block. make sense? jeff
-
Jeff Your 30 seconds has taken me days of googling and finding nothing and hours of reading with no information, your 30 seconds actually makes sense and i can actually see what goes where BUT how do i connect to the inside rail and how do the wires connect to cab A and cab B ?? is cab A and cab B simply connected together via the DPDT I can see that i can daisy chain the DPDT via a terminal block How do i wire up my block sections on the inside track ??
-
No worries im use to the snickers and the comments like it looks like it belongs on the refrigerator! I guess i could have done a ChatGPT statement and add “make it look like a 4 year old drew it!” basically all your blocks get wired as above. Of course for the throttle connections you can just do jumpers from switch to switch and then one end of the string go to your throttle. I would do like 18 or 20g wire for these connections between the switches. 18g gives good current, but 20g is more flexible in tight spaces. For the wires out to your track blocks i would use a terminal strip at the control panel to attach your long lines going out to the track to short pieces of wire to go to your dpdt switches. This will help if you have to do any troubleshooting later like a switch got its polarity reversed or something. Also makes it so you can pull the control panel off if needed and not have to snip all your track wires. just strip like 4-5mm and tin the end of the wire and tin the terminal and just fuse them. Goes pretty quickly. jeff
-
Today I picked up a Kato 4 car E231-500 to complete my grail set of a 10 car Chuo-Sobu Line set. I'm so happy to have completed this set.
-
Hello to all, I just joined this forum. I’ve primarily modeled European trains but recently discovered Japanese trains, and have been collecting as much as I can afford. I’m very excited to be part of this forum.//chris