All Activity
- Past hour
-
HI, Little more info about the magnet uncouplers. Each wagon has a small magnet attached to one of the couplers. It was a bit of a hassle to use the large magnet uncoupler for the wagons. The couplers on most of the wagons are not so easy to lift up as the ones on the locomotives with one magnet under the track. To make everything work properly i had to stack 2 magnets and now the wagon couplers work better. Downside is that all the wheels are pulled in the direction of the uncouple magnets so timing is important. The pulling force of the magnets is huge now so funny things can happen when one of the bogies get caught by the magnet It is doable but it doesn't work every time 100% like it should.

- Today
-
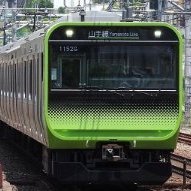
Wasn't a similary EMU Series operated by Meitetsu?
-
@disturbmanWow that's amazing, I wonder if I think I can become a millionaire I will lol. Thanks a lot for the heads up on this I will speak to my exporter and see if he can get this for me when it comes out. This is amazing news thanks again. 😁
-

Best way to wire up this layout?
TattTatts replied to TattTatts's topic in DCC, Electrical & Automation
Thanks for the replies so far. There's a lot to think about, isn't there? I'm planing to nail it all down in the end but want to set it up first and experiment and get some experience with it for a bit first. I'll have a think about soldering, I do actually have a soldering iron somewhere so may try and dig that out! -

What did you do on your layout today? (N scale)
Keisarikonen replied to bill937ca's topic in Layout Building
I tried my hand in making my own cherry blossom trees from scratch using my newly made cherry blossom flock and florist wire. I first had a large one what I covered fully with putty and painted brown, looks like any run of the mill tree, and from afar, it does look prototypical. I also purposefully make this cherry blossom large so there's like a "Mother tree" Once then I moved on to other trees and experiment using a mix of wall putty, PVA glue and brown paint. I love that once it dries, it gives such a woody and coarse texture. I also glued some brown static grass from thread. Once everything dried, I pasted the cherry blossom flowers, trying to balance the puff aspect while not looking too bare. Also sprinkled some white on the soil and the trees, also plucking some leftover cherry blossom scatter to place on the ground (Advice from @GeorgeHInch) The results are honestly brilliant, I absolutely love this particular picture.
-
Ikonen's Finnish N Scale Project Diary
Keisarikonen replied to Keisarikonen's topic in Layout Building
Neljä vuodenaikaa: 春, 夏, 秋, 冬 (Four Seasons: Spring, Summer, Fall, Winter) – Pt. 2 Summer was surprisingly difficult. Without a beach scene, it’s harder to visually convey the essence of the season. I added plenty of overgrowth and lush trees, and even included a small well from an old DM-Toys kit, which brought a charming, rustic touch to the module. Still, I feel that summer is the weakest of the four—it lacks a clear identity. I’m considering adding more trees to create a denser, more vibrant look. Maybe even a BBQ figure or two to highlight that quintessential summer feeling. Now that all four modules are roughly complete, here’s how they’ve come together: Winter features a village road and a lamppost repurposed from my previous snow suitcase layout. I’m glad I didn’t overcrowd the module; the snow alone is already an X-factor. The stark, bare scenery does a great job of capturing the quiet beauty of Finnish winter. Simple and effective. Fall turned out to be wonderfully rich in color. I’m particularly happy with the interplay between the static grass and the orange flock, and the addition of blueberry bushes really makes the colors pop. That said, I do worry I may have gone a bit too far with the fall tones—it’s bold, perhaps a little overdone. The tiny house nestled into the scene adds just the right amount of contrast and character. Summer, as mentioned, was the hardest to get right. While it stands apart from fall and winter, it unfortunately looks too similar to spring. I’ve come to realize that capturing summer may be more about enhancing the contrast of spring and fall—making their colors more distinct so summer doesn’t feel like a visual in-between. For future projects, I might explore other representations of summer beyond the typical beach or water scene. Spring is my personal favorite. Some might find the colors too bold or tacky, but I absolutely love the energy it brings to the layout. The cherry blossom trees, in particular, are my favorite part so far, and they will definitely carry over into my next project. The pink flock I made from sponge and Vallejo paint worked beautifully to create cherry blossoms, and the vibrancy it adds is exactly what I envisioned. As I write this, I’m still in the process of 3D printing the parts for the industry and station modules. I’ll be sure to update you once those are ready. I will also be going to the makerspace on tuesday this week to sand down the imperfections of the foam and paint the sides black. I am pretty much happy with making modules, it does provide a sense of accomplishment and fun in building bits quickly rather than turtling one whole diorama. I am possibly considering going into T-Track or the module standards set by INGA (the one that the Finnish N-Club primarily uses)
-
Kato D51 (1-203) - Issues and Reviews
kusojiji replied to Kamome's topic in Japanese: Other Gauges & Scales
Shows more on the actual dcc install. He did everything I was planning to do. Awesome! I guess you send him the model and he upgrades. -
Ikonen's Finnish N Scale Project Diary
Keisarikonen replied to Keisarikonen's topic in Layout Building
Neljä vuodenaikaa: 春, 夏, 秋, 冬 (Four Seasons: Spring, Summer, Fall, Winter) Status (Operational, Ongoing) Type: Freeform Modular Track: KATO Unitrack Base: XP Foam. Operation: DC/DCC (Arnold, Mehano, Trix) Features: 4 Seasons, modular, extendable. SCARM: SCARM File: Description: As a member of the local modellers’ club, I was at our April meeting when one of the senior members brought in some used XP foam. I grabbed a hefty chunk, thinking it’d be perfect for a “club layout”—something simple, especially since I’m the only one focusing on model trains. My first idea was to make a scenic slab inspired by Toporama. I considered adding hinges or a rudimentary folding system so the foam could fold in half. My plan was either to mount the Unitrack directly onto the foam or keep it detachable like a scenic insert. But during a discussion on layouts and starter sets, @Yavaris Forge reminded me of a hybrid modular concept—track modules instead of a single large layout. This would make floor-running, transport, and storage easier while still offering the flexibility to build scenic sections. That resonated with me. I was also low on scenery materials, and working with smaller modules would make the most of what I had. Plus, with a model railway event coming up in mid-May, it seemed like perfect timing. After consulting with my partner, I decided to go ahead with the plan. First, I needed to lay things out in SCARM. I can’t remember the exact dimensions of the foam, but I do remember spending hours cutting it in the clubroom with a steak knife and a cutter. I really wish I’d had a foam cutter—it wasn’t pretty. (Please forgive my cutting skills—they’re subpar. I’ll be sanding everything down tomorrow.) Despite the rough cuts, I managed to create one 248mm module using two 124mm sections, and I had enough scrap foam left for a 248mm module. Then came the hard part: choosing a theme. My first thought was to go whimsical, like the Kato Diorama Circus—just for fun, without worrying about realism. Another idea was a plain grassy landscape for seamless connections. But after looking at some cherry blossom trees, inspiration struck—I’d build a four-season layout, with each module representing a different season. I started by aligning the tracks to the foam, which was trickier than I’d expected. I couldn’t find my rerailer, which made spacing harder to gauge. Once everything was glued in place, I painted the foam sides brown to simulate soil. I also found some tundra-colored flock that matched the Unitrack and used it as ballast. It didn’t have the texture of real ballast, but it looked decent from a distance and was surprisingly sturdy. I had to rip some of the turnouts apart however, as I found some of the turnouts to be completely stuck due to multiple factors. I began with the winter module, since I still had plenty of snow flock left. I painted the sides of the track with glue and conservatively applied glue between the rails, avoiding the rail tops. To build up snow thickness, I simply scattered more flock. Because the base is foam, I could just flip it upside down over a container lid to shake off the excess and repeat as needed. I restrained myself from overdoing it at first—I wanted to finish all four modules before committing to heavy detailing. Yet overall, this is how winter ended up. Next came autumn. I glued brown areas and applied static grass, then added orange flock to mimic fallen leaves. I strategically placed some bare armature trees to show the end of the season, while mixing in green trees for variety—some trees in Finland do stay green in the fall. I also tried placing a small building from Siltakylän Ratayhtiö to see how structures might fit. The narrow space meant only tiny buildings worked, but maybe that’s the charm—less is more. For spring, I wanted to capture Finland’s beautiful floral colors. I envisioned cherry blossom trees as the standout feature. I’d also considered frozen lakes, since ice can linger well into spring, but colored flock is hard to find and expensive here. So I made my own: I bought some cheap white sponges (€1 for three), then blended and dyed them using Vallejo paint for a cherry blossom pink. While waiting for the sponge flock to dry, I started on summer. (Continued in Part 2)
-
Kato D51 (1-203) - Issues and Reviews
kusojiji replied to Kamome's topic in Japanese: Other Gauges & Scales
DCC installation. I didn't realize that the tender is a scaled up version of the n-scale one so exactly. The brakes come off and then the trucks the same way. Hope this helps. Just turn the volume down... -
I wouldn't be too worried about fitting the motors in. Usually there is a way to do that, even if you'll need to trim some parts a bit. As far as I know, the steam locos are tricky but the rest should be possible even if its not stated on the box. Just keep in mind, that you can put the motor almost anywhere in the train (for example motorizing a passenger car that is pushing the loco and the rest of the train). For me the worrying part is about the availability of running gear by Bandai. By now the sources are drying out and / or getting pricey... However, if you go with Kato gear, you'll be fine i guess. I also saw that Bandai removed the Shorty page... Wanted to check something a while ago and it was all 404
-

Popondetta - New Releases
disturbman replied to katoftw's topic in New Releases & Product Announcements
@bc6 you will be pleased, Popondetta just announced the Nankai 8300 Series. https://ngauge.jp/poster/popon20250512/ -
Health issues are still ongoing, but I've found that working on the layout is taking my mind off things a bit. I worked on it quite a bit over the past weekend. Finished gluing up the cork and sanded it. The urban (front) and express (middle) lines are still a bit too long. I'll cut those to length when I've finished cutting out the right edge of the section. Painted the cork a dark earth colour. I've used Woodland Scenics earth undercoat with a little black mixed in to paint them. Adjusted the track plan a bit again. I was looking at making it possible to get a locomotive from the 3 through tracks to the depot without shunting too much on the main line. Initially I tried using some double slip switches, but that looked off, and after getting some advice about it not being accurate for JNR, I redid it again to get to this design. It's still not very JNR due to having quite a few turnouts, but I also want a certain amount of play value. Considering the main line trains will be computer controlled, it made sense to get most shunting off the main line. In this plan: The orange line is the main line for the urban trains, the lighter orange in the station are where trains will stop. The middle track is a passing track for rapid urban trains, and also for freight to park to make space for passenger trains to pass The top cyan track is the local line platform (shown in blue for the rest of the plan). The bottom cyan track is for getting access to the service yard, and possible also for some special trains. The blue line is the local / mountain line. The short blue section in between the turnouts can be used for temporarily storing trains / locomotives The dark violet tracks going into the service shed are diesel / electric service tracks The yellow track is a MoW storage track The red track is additional access to the turntable For the bottom 5 parallel tracks, the top one is for picking up ash from the ash pit. The pit will be located somewhere in the top one of the 3 parallel tracks going into the turntable. I might extend the pit to the top 2 tracks The black track at the bottom is for coal delivery. Coal will be delivered via short trains on the local line. The bright green blocks are the table legs, I'll try to build a coal bunker / coaling tower around that area. Coaling tower will probably be able to service the bottom 2 of the parallel tracks heading into the turntable The turntable position / size / connected tracks are just in indication. I'll be use a World Kougei turntable, so I'll need to see what's possible once it's built. The track plan looked rather busy, so I decided to try it with actual track. I had a bunch of turnouts available since I ordered quite a few of them a while ago to build this segment. With the changes I need some additional turnouts, but I did manage to get quite a bit of it in place. Track is screwed down, but not wired yet, since I'm not 100% certain this is the final track plan. Closeup of the station area, this will definitely stay as it is. Tracks along the platform are a little over 1 meter in length, so plenty space for some urban trains. Closeup of the station approach. It still looks quite crowded, but looks less crowded than it did in the track plan. I'll do a bit of playing around with some cars/coaches to see if this works like I want it to work. Overall I'm quite happy with it, and I think once there's ballast and buildings, all the turnouts won't be as noticeable as they are now.
-
Kato D51 (1-203) - Issues and Reviews
kusojiji replied to Kamome's topic in Japanese: Other Gauges & Scales
The literature says two motors. If one wasn't working, I guess it was being dragged along with the coupling. Yeah, that clip for the leads leaves alot to be desired. If one of the bogies isn't passing the battery test, then I check those leads. Yeah, that's why I have 1 model in its box and the other needing additional work. I didn't know how to send stuff back to the UK from here, so I performed surgery. At least Accurascale is still willing to work with me on this. They have sent me two wheelsets for both my P class locos. I have since figured out Japan Post and have sent 3 back so far. 1460 yen for a 385 gram box (n scale loco). Rails of Sheffield reimburses the return shipping cost. -
Kato D51 (1-203) - Issues and Reviews
Kamome replied to Kamome's topic in Japanese: Other Gauges & Scales
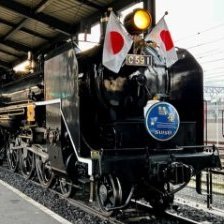
I didn't require too much digging. The body is easily removed once you have taken off the cab. The screw in the cab releases the boiler body and the whole thing can be removed sliding the the body slightly forward. Just need to be careful with the reversing rod parts The front coupler assembly is a hindrance if you've already attached the snowplough, so I had to remove the front wheel by taking off the brake pad parts on the underside and sliding arm for the pony wheel forward. Then I could remove the front coupler as the body with snowplough fitted won't fit over the knuckle. The light board has 4 contacts. I'm not sure of the full construction of the model, but looks like it could possibly have 2 small motors. If that is the case, there must be some kind of primitive differential to the dual fly wheels as the mechanism worked with only 2 motor contacts connected. I didn't venture further into the breakdown as I couldn't see how some of the plastic pipework removed from the chassis block and didn't want to risk breaking anything. The motor contacts slide over the contact points on the light board, attached to it with a tab joiner in the shape of a capital "B" This is where I assume the problem is, a couple of tabs able to slid off and on quite easily. As mentioned I crimped them a little more and they fit more securely. Further failures will result in them being soldered. Actually I have had a few HO locos with a similar issue from Kato. There's a few nuances with them. Work fine out of the box, but something not fully secured and suddenly the model has no power. I have an EF65 and EF58 and both have had issues with contact connections. On these locos the pickup wires from the bogies fit under a fold down tab on the lightboard that can work themselves loose after a while. The more recent EF510 and EF81 don't have this issue due to their twin bogie mounted motors. I sort of don't mind a little bit of tinkering if its a quick fix, but I agree this really shouldn't be an issue on a brand new model. If I would've had to send it away, that would be way more bother. I sort of like to see how it goes together in case something else goes and I need to dismantle it. -
People’s Republic of China N Scale trains
disturbman replied to gavino200's topic in Worldwide Models
Maybe her or the HXD1D will be this week (re)release. As far as I know, the DF7 is still a couple weeks away from release. -
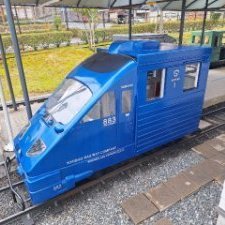
Does your GE4/4 have only two speeds? Stop and speed of light? With my standard pack, it is very hard to control. Feels like it has a cap in it.
-
Kato D51 (1-203) - Issues and Reviews
kusojiji replied to Kamome's topic in Japanese: Other Gauges & Scales
You actually dug in to the lightboard area? That sucks that you are having to fix that. -
I think it was mentioned earlier, but I too am worried about being able to motorize. I bought one that cannot and some of the advertisements do not include that info. If they showed all sides of the box, I think it might state it. The bandai site no longer includes B-train.
-
My attempts at disorganization... The rest of my stuff is in boxes in the loft.
-
Japan 2026-1: South (Ryukyu Islands)
RS18U replied to RS18U's topic in Travel: Tips, Planning & Memories
Well time to get back into this! My wife and just got back from almost a month in the British Isles, the longest holiday we have ever done so we learnt a lot. For example: Plan some downtime about half way through a long trip, some days when you don't have to set the alarm, there are no entry tickets to worry about, no specific trains to catch. We really only had a single day off (most of the time was on a coach tour) and it got pretty tiring. I was aware of this concept before but this last month really brought it home, especially to my wife. Try to pick overnight stops where you can be there at least 2 nights. Sure helps with managing the trip. Fortunately the London part of our last trip was like that, making London more enjoyable. Pack light, and wash cloths as you go. Which means hotels with laundry facilities. Generally we have done well on this in Japan, but in the UK none of our hotels had coin laundry so we spent time (and money) at a launderette and washing in the sink. So based on these I will be re-evaluating our trip a bit, with a focus on where the break will be. -
Yeah that would make things much faster! Might even etch some dado joints! Actually a friend just got a nice little cnc cutter that takes about 18”x18” so this might be a good little project to play with making some nice exact pieces and some dado and rabit joints easy in very thin Baltic birch. Could even etch the shelves into the back board. As i get older i am enjoying smaller woodworking projects and seeing what is little cnc can do is making me like that as well as a lasercurtter! jeff
-
Sounds like you need that laser cutter Jeff! 🫣 Todd
-
People’s Republic of China N Scale trains
Section31 replied to gavino200's topic in Worldwide Models
@disturbman I actually decided to preorder an second cr400 bf-z as future gift to someone. Honestly can’t find better gifts at those prices. I want the upcoming hxd3d as well i saw mentioned. -
Hello Friends Just a little Fluff update If you read this thread you will know i love to collect Lyddle End Items I have over 100 now ,collecting since 2010 Because this line went out of production around that time,sourcinghas been difficult. You end up paying as much or more than when they came out One of the items that has alluded me was the Little post office I always(try) and but them mint,so it took awhile but after 15 year hunt i finally snagged one ,never taken out of the box,from USA of all places Regards Brett PS Going to have a much better update soon.
- Yesterday
-
I had the idea of making the trays out of some nice thin wood so that i could maybe make a holder to put a few on the wall or just stand on a bookshelf for display, then flip horizontal for storage stacked. Main issue is separation of layers due to the winder stems sticking out. But i could make the outside box of each layer have a recessed underside to cover over the winding stems sticking up on the layer below. Thing with a display shelf like that is it needs to be very thin and clean and gets to be some work. In the mean time i will probably just slice up a bunch of corrugated cardboard and get out the hot glue gun to make some better storage and storage. jeff